l1n6yun's Blog

记录学习的技能和遇到的问题

关于

随着时间的推移,个人站点的博客文章会越来越多,那怎么样才能快速找到你印象中的文章呢?增加一个站点内的搜索功能是非常有必要和方便的。
具体操作

  1. 安装搜索:在Hexo的根目录下,打开命令可执行窗口,执行如下命令:
1
npm install hexo-generator-searchdb --save
  1. 全局配置文件_config.yml,新增如下内容:
1
2
3
4
5
search:
path: search.xml
field: post
format: html
limit: 10000
  1. hexo主题配置文件(\themes\next_config.yml),修改local_search的enable为true:
1
2
3
4
5
6
7
8
9
10
11
12
13
# Local Search
# Dependencies: https://github.com/theme-next/hexo-generator-searchdb
local_search:
enable: true
# If auto, trigger search by changing input.
# If manual, trigger search by pressing enter key or search button.
trigger: auto
# Show top n results per article, show all results by setting to -1
top_n_per_article: 1
# Unescape html strings to the readable one.
unescape: false
# Preload the search data when the page loads.
preload: false

使用方法

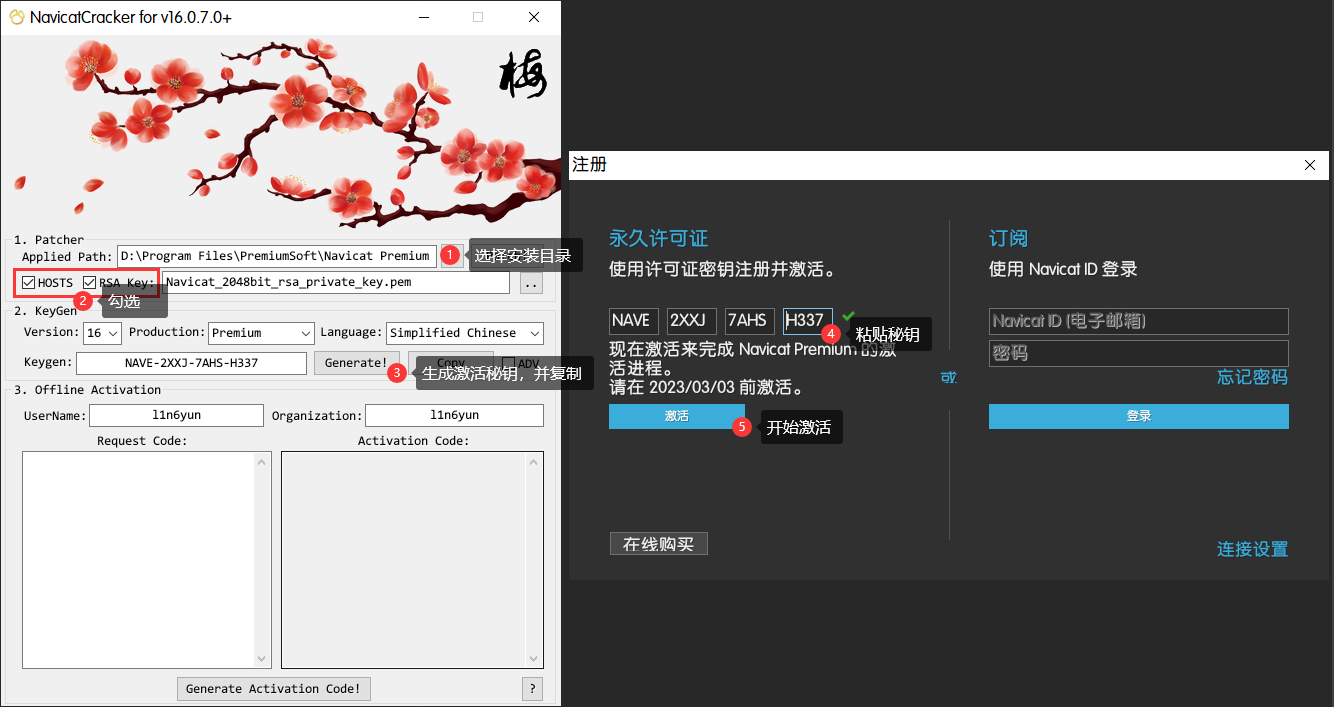
  1. 打开破解工具
  2. 选择 Navicat 安装目录,勾选 HOSTS 和 RSA key,点击 Patch
  3. 打开 Navicat Premium 输入许可证,点击 激活 按钮

upload successful

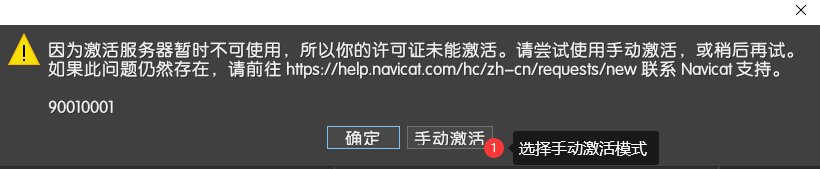
  1. 等待弹出服务器不可用窗口,点击 手动激活 按钮

upload successful

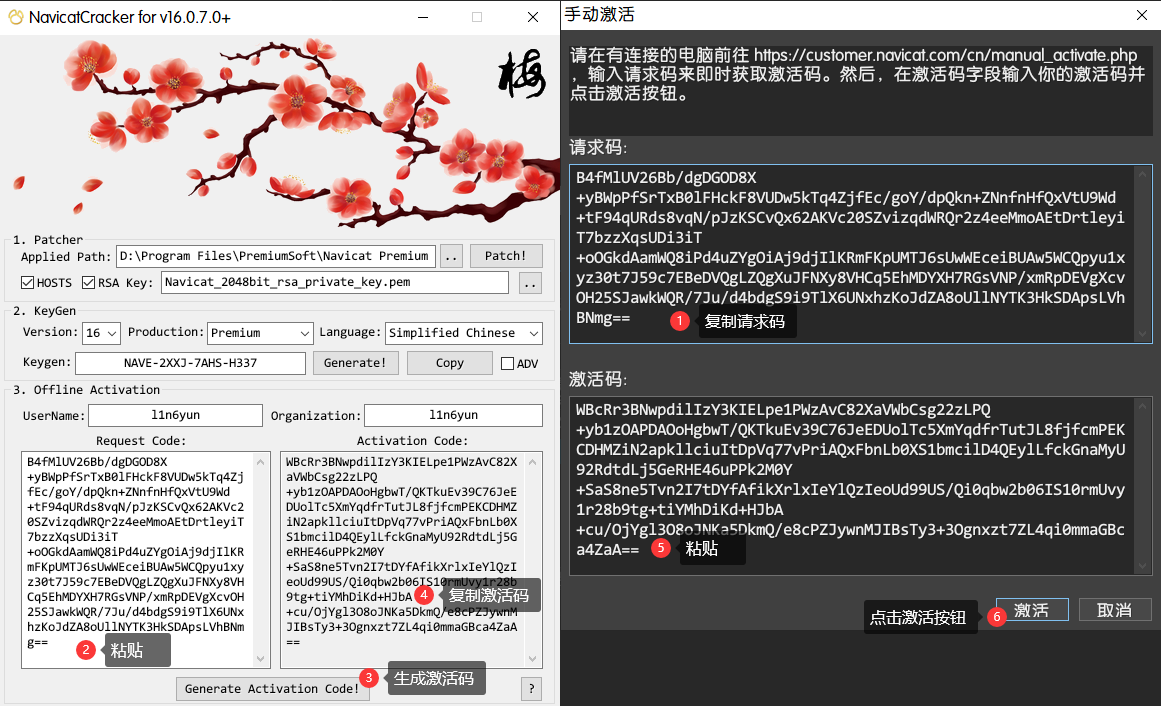
  1. 请求码 复制到激活工具中的 Request Code 输入框中

  2. 点击 Generate Activation Code! 按钮,生成激活码

  3. 生成好的 激活码 复制到 Navicat Premium 中,点击激活按钮

upload successful

upload successful

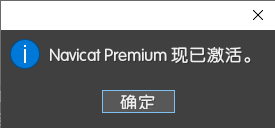
  1. 预览一下破解结果

upload successful

下载地址

阿里云盘

下载视频,并将m3u8格式转为mp4格式

1
2
3
ffmpeg -i https://bitdash-a.akamaihd.net/content/sintel/hls/playlist.m3u8 playlist.mp4
或者
ffmpeg -i https://bitdash-a.akamaihd.net/content/sintel/hls/playlist.m3u8 -c copy playlist.mp4

下载中。。。由于视频很大,下载需要很长长长时间(1个G的视频可能需下载几小时…)。
可以通过如下指令进行下载提速(下载速度大约能提升到几到十几分钟,很棒了哦,起码比百度云快):

1
ffmpeg -i https://bitdash-a.akamaihd.net/content/sintel/hls/playlist.m3u8 -c copy -bsf:a aac_adtstoasc playlist_1.mp4

1
ffmpeg -f concat -i filelist.txt -c copy -y FBF73ED7.mp4

filelist.txt

1
2
3
4
5
6
7
8
9
10
11
12
13
14
15
16
17
18
19
20
21
22
23
24
25
26
27
28
29
30
file 'FBF73ED7.p701.1.mp4'
file 'FBF73ED7.p701.2.mp4'
file 'FBF73ED7.p701.3.mp4'
file 'FBF73ED7.p701.4.mp4'
file 'FBF73ED7.p701.5.mp4'
file 'FBF73ED7.p701.6.mp4'
file 'FBF73ED7.p701.7.mp4'
file 'FBF73ED7.p701.8.mp4'
file 'FBF73ED7.p701.9.mp4'
file 'FBF73ED7.p701.10.mp4'
file 'FBF73ED7.p701.11.mp4'
file 'FBF73ED7.p701.12.mp4'
file 'FBF73ED7.p701.13.mp4'
file 'FBF73ED7.p701.14.mp4'
file 'FBF73ED7.p701.15.mp4'
file 'FBF73ED7.p701.16.mp4'
file 'FBF73ED7.p701.17.mp4'
file 'FBF73ED7.p701.18.mp4'
file 'FBF73ED7.p701.19.mp4'
file 'FBF73ED7.p701.20.mp4'
file 'FBF73ED7.p701.21.mp4'
file 'FBF73ED7.p701.22.mp4'
file 'FBF73ED7.p701.23.mp4'
file 'FBF73ED7.p701.24.mp4'
file 'FBF73ED7.p701.25.mp4'
file 'FBF73ED7.p701.26.mp4'
file 'FBF73ED7.p701.27.mp4'
file 'FBF73ED7.p701.28.mp4'
file 'FBF73ED7.p701.29.mp4'
file 'FBF73ED7.p701.30.mp4'

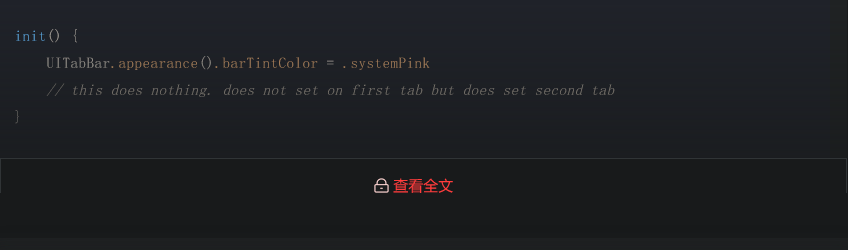
在阅读一些网站文章时,时常会遇到文章内容只展示一部分,用户需要 关注博主、或者关注公众号 的一系列障碍。

upload successful

upload successful

于是使用“开发者工具”分析了一下前端代码发现。大多数实现逻辑基本上都是将文章内容元素设置一个较小高度,超出的部分隐藏掉。再在后追加一个“查看全文”的元素。

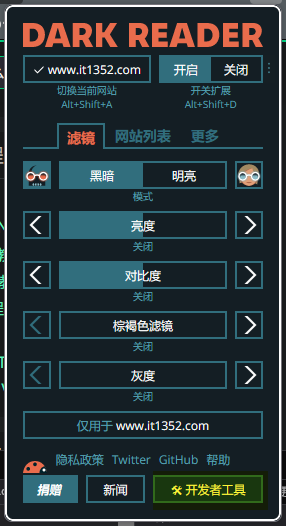
想起 Dark Reader (暗黑)插件的自定义CSS功能,因为在使用通用暗黑方案后不能满足所有网站,所以要对一些不能完美适配的网站添加亿点自定义代码。在这正好派到了用场。(当然你也可以使用其他插件)

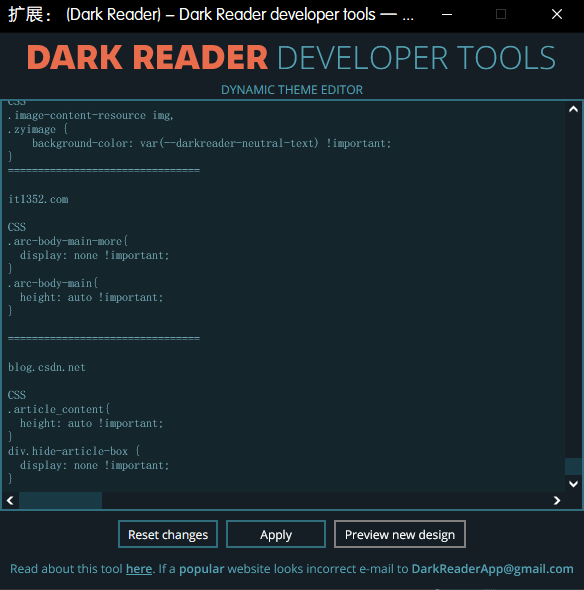
打开 Dark Reader 插件,点击开发者工具

upload successful

在 主题编辑器 中添加一下代码:(这里用了IT屋和CSDN做演示)

1
2
3
4
5
6
7
8
9
10
11
12
13
14
15
16
17
18
19
20
21
22
23
================================

it1352.com

CSS
.arc-body-main-more{
display: none !important;
}
.arc-body-main{
height: auto !important;
}

================================

blog.csdn.net

CSS
.article_content{
height: auto !important;
}
div.hide-article-box {
display: none !important;
}

upload successful

点击 Apply,刷新网站,就可以清除全文阅读限制了

实现原理很简单:隐藏关注元素,清除文章内容元素的高度限制。

注:此方法只能用于前端限制,后端限制是不行的。

介绍

PHP CS Fixer (PHP Coding Standards Fixer)是一款通过编码标准来修复代码的工具。它支持 PSR 编码规范和其他社区驱动(如 Symfony),还可以根据自己(团队)的风格进行自定义配置。

安装

安装 PHP CS Fixer 推荐使用 Composer 来进行安装。可以进行全局安装或者直接安装到项目中

1
2
3
4
5
# 全局安装
$ composer global require friendsofphp/php-cs-fixer

# 为项目安装
$ composer require --dev friendsofphp/php-cs-fixer

用法

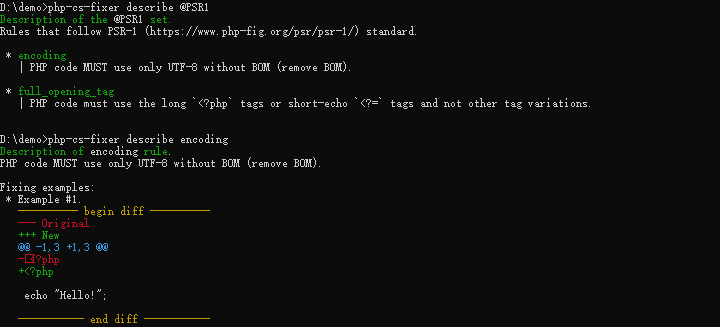
describe 查看规则规则集

upload successful

fix 修复一个文件或者目录

使用 fix 命令可以对文件或者目录进行修复

1
2
$ php-cs-fixer fix /path/to/dir
$ php-cs-fixer fix /path/to/file

--path-mode 输出格式选项,支持 txt、json、xml、checkstyle、junit 和 gitlab。(默认txt)

--quiet 不输出任何信息。

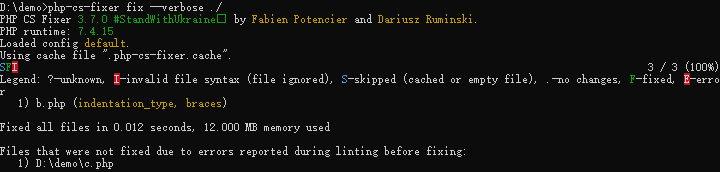
-v --verbose 选项将显示应用的规则。
-vv 啰嗦
-vvv 调试

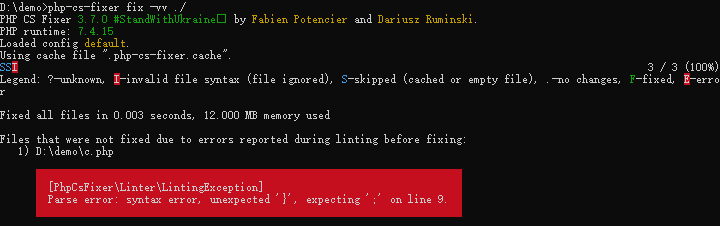
upload successful

出现“修复后 linting 期间报告的错误”,可以使用它来更详细地进行调试

upload successful

--rules 指定修复规则

1
2
3
4
5
6
7
8
9
$ php-cs-fixer fix ./ --rules=@PSR12

$ php-cs-fixer fix ./ --rules=line_ending,full_opening_tag,indentation_type

$ php-cs-fixer fix ./ --rules=-full_opening_tag,-indentation_type

$ php-cs-fixer fix ./ --rules=@Symfony,-@PSR1,-blank_line_before_statement,strict_comparison

$ php-cs-fixer fix ./ --rules='{"concat_space": {"spacing": "none"}}'

--dry-run 运行修复程序但不修改文件

--diff 以 udiff 格式输出修改内容

--allow-risky 是否运行有风险的修改,传入参数(yes or no)

--stop-on-violation 修复一个文件后停止执行

--show-progress 显示处理进度

退出代码

退出代码 fix命令是使用以下位标志构建的:

  • 0 - 好的。
  • 1 - 一般错误(或 PHP 最低要求不匹配)。
  • 4 - 某些文件的语法无效(仅在试运行模式下)。
  • 8 - 某些文件需要修复(仅在试运行模式下)。
  • 16 - 应用程序的配置错误。
  • 32 - Fixer 的配置错误。
  • 64 - 应用程序中出现异常。

PHP CS Fixer 介绍

PHP CS Fixer (PHP Coding Standards Fixer)是一款通过编码标准来修复代码的工具。它支持 PSR 编码规范和其他社区驱动(如 Symfony),还可以根据自己(团队)的风格进行自定义配置。

PHP CS Fixer 安装

安装 PHP CS Fixer 推荐使用 Composer 来进行安装。可以进行全局安装或者直接安装到项目中

1
2
3
4
5
全局安装
composer global require friendsofphp/php-cs-fixer

为项目安装
composer require --dev friendsofphp/php-cs-fixer

PhpStorm 配置

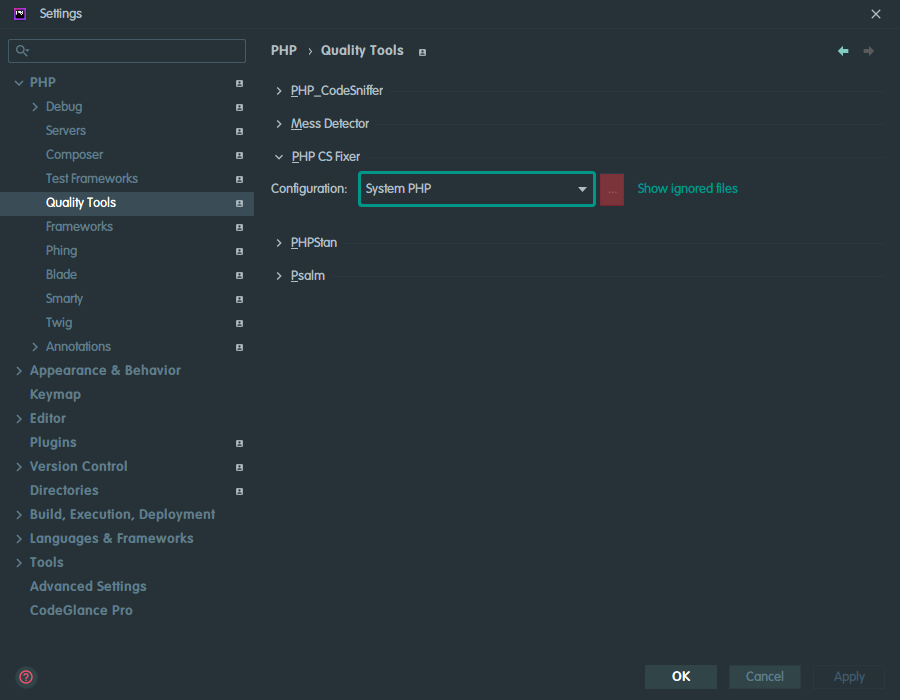
PHP > Quality Tools 找到 PHP CS Fixer ,点击配置.

upload successful

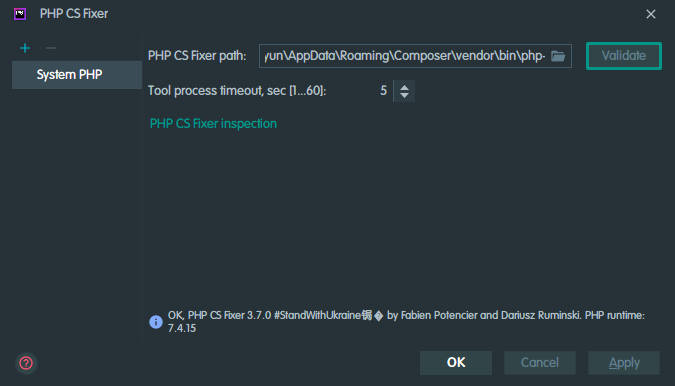
在路径中选这个刚刚安装好的 PHP CS Fixer C:\Users\l1n6yun\AppData\Roaming\Composer\vendor\bin\php-cs-fixer.bat.

点击 验证 按钮验证是否安装成功.

upload successful

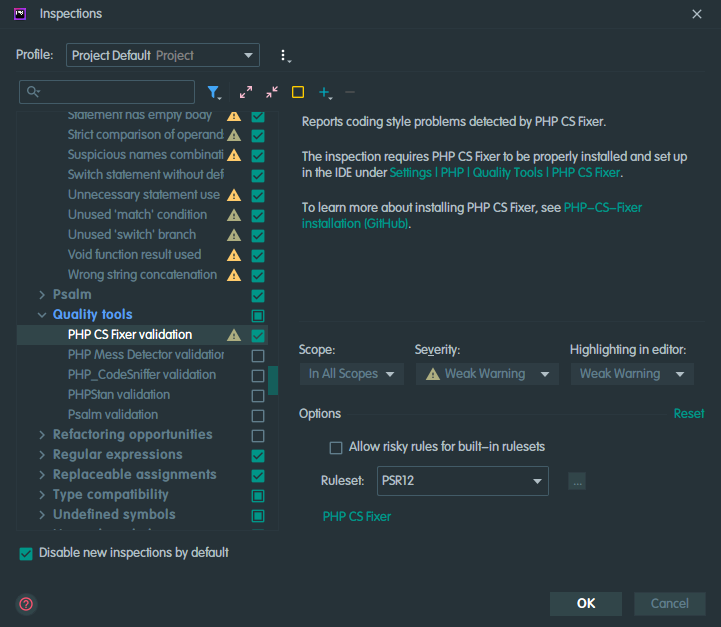
点击 PHP CS Fixer inspection 配置,在检测页面开启,并根据项目要求配置检测规则集

upload successful

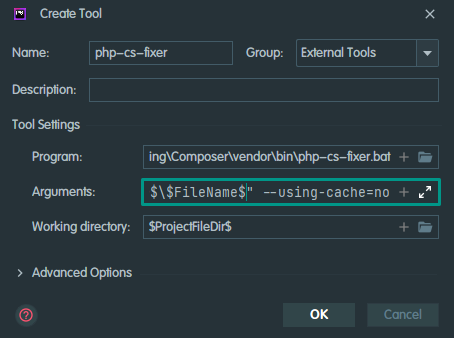
配置外部工具

Program: C:\Users\l1n6yun\AppData\Roaming\Composer\vendor\bin\php-cs-fixer.bat

Arguments: fix "$FileDir$\$FileName$" --using-cache=no

Working directory: $ProjectFileDir$

upload successful

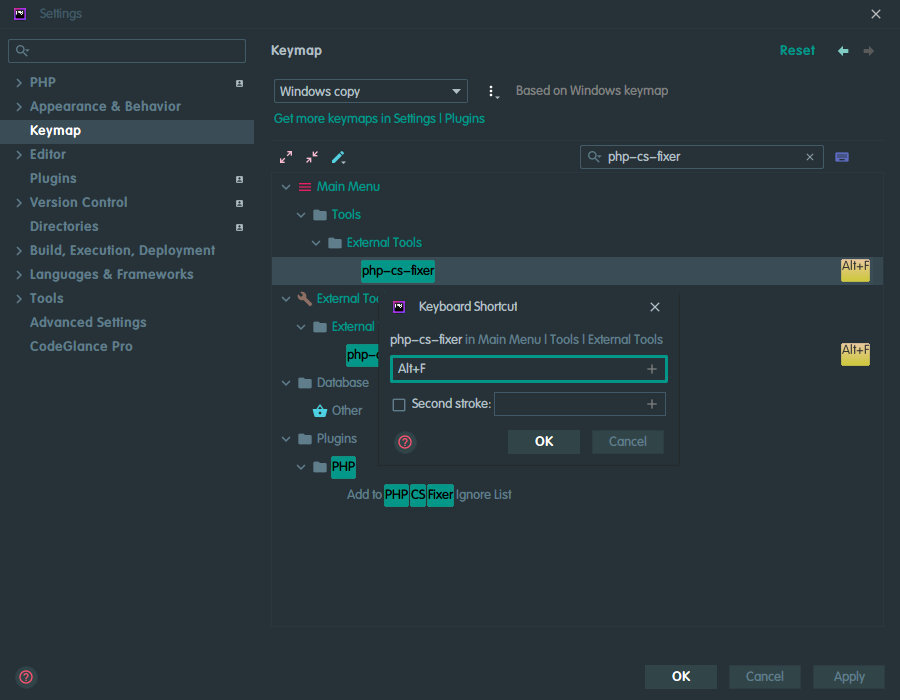
添加快捷键

upload successful

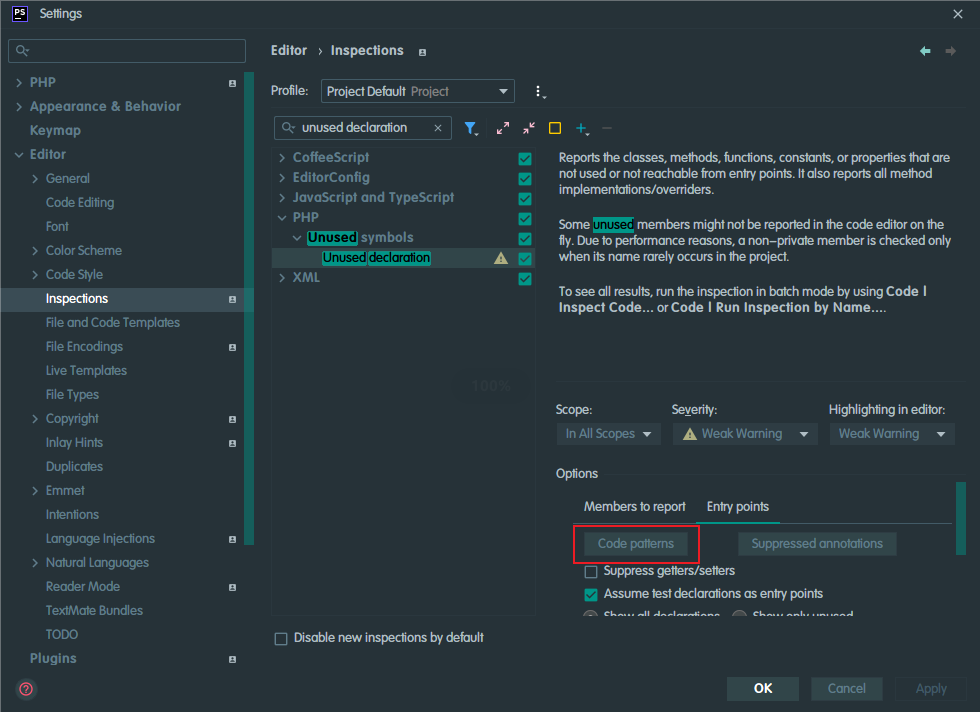
Editor > Inspections 中找到 Unused declaration ,在 Options 中的 Entry points 表中中点击 Code patterns

upload successful

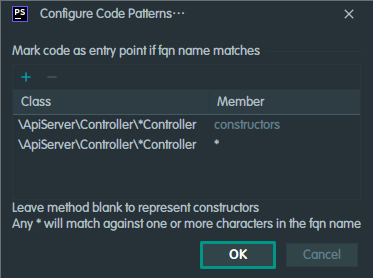
根据项目的控制器命名空间添加2条记录。(Member为空,表示构造函数,*表示所有函数。支持正则匹配,可以根据实际代码调整。)

upload successful

软件介绍

PhpStorm 是 JetBrains 公司开发的一款商业的PHP集成开发工具,旨在提高用户效率,可深刻理解用户的编码,提供智能代码补全,快速导航以及即时错误检查。

软件安装

软件下载地址:https://www.jetbrains.com/phpstorm/
下载后自行安装。

破解激活

打开 JETBRA.IN 检查器 | IPFS 页面,检测器会自动给你匹配出你可以连接上的服务器地址,找到一个适合的地址打开。
在网页顶部找到 jetbar.zip ,点击链接下载破解工具,该软件仅作测试用途,不作商业用途!

pasted-14

下载完成后,解压出来。(我习惯解压到 D:\Program Files\JetBrains\jetbra 这个目录,和 JetBrains 全家桶放在一个目录)
运行 jetbra 中的 “./scripts/install-all-users.vbs” 文件,来配置 vmoptions。
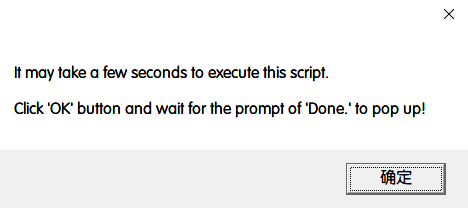
pasted-15

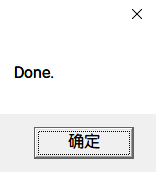
点击确认按钮,等待完成弹窗。(可能需要几秒钟,耐心等待一下)

pasted-16

在刚刚下载激活工具的页面找到PhpStorm,点击 Copy to clipboard,复制激活码。
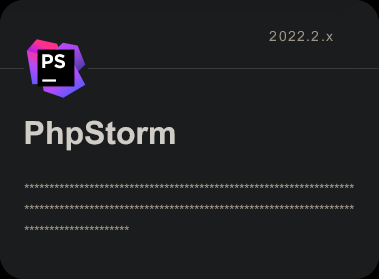
pasted-17

运行软件来到激活页面,激活方式选择 Activation code,粘贴刚刚复制的激活码,点击激活按钮,即可完成激活。
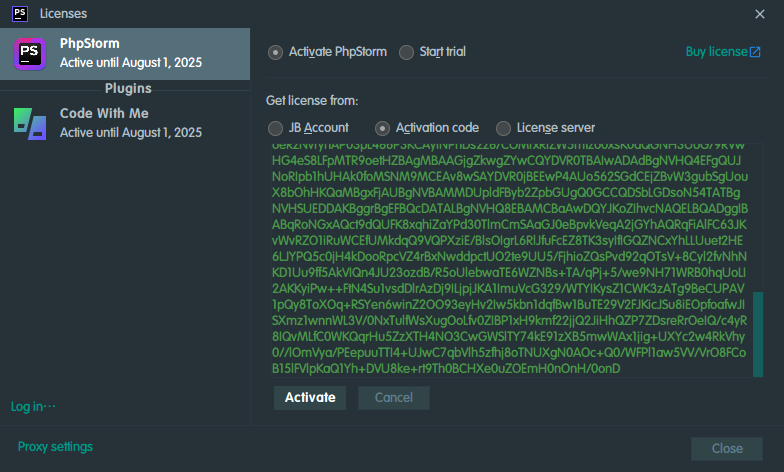
pasted-18

插件

Material Theme UI Lite

Atom Material File Icons

GitToolBox

GitToolBox 是 git 增强工具,功能十分强大。

CodeGlance Pro

它在编辑器窗格中显示类似于 Sublime 中的缩小概览或小地图。 小地图允许快速滚动,让您直接跳转到代码部分。

配置

UI配置

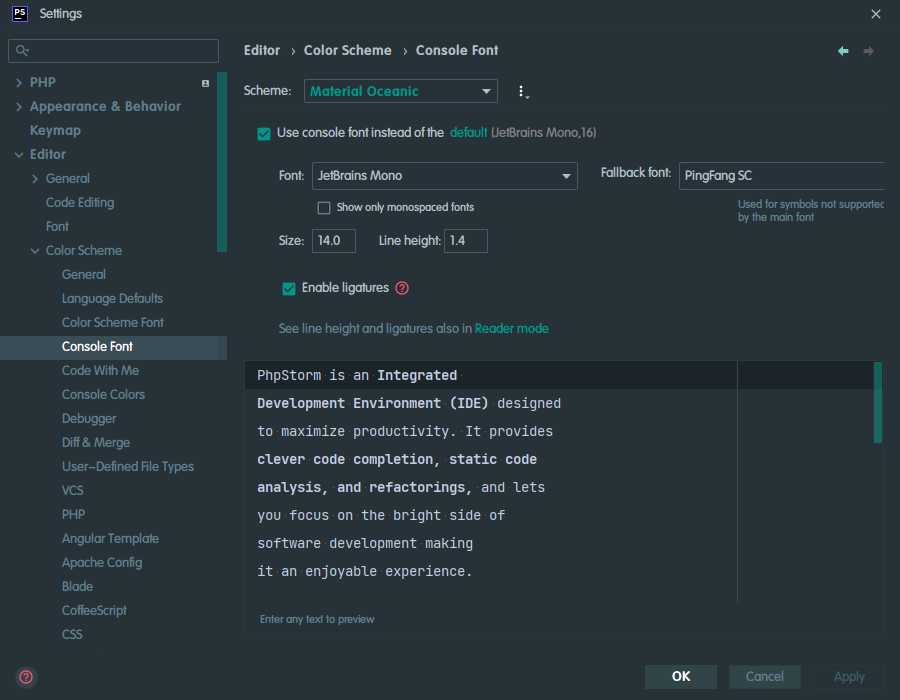
设置主题并设置软件字体和大小
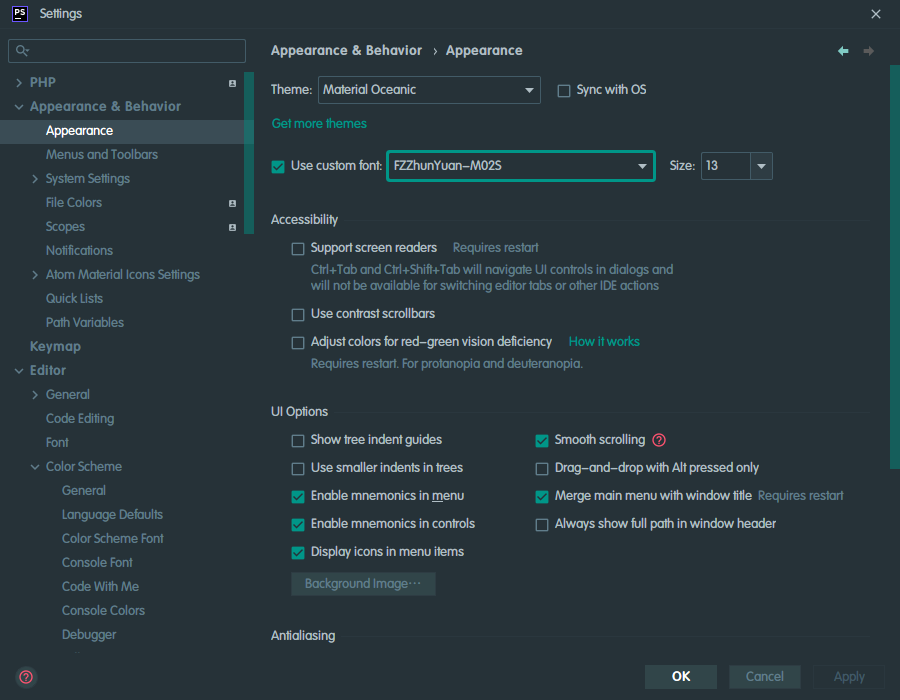
pasted-19

设置代码配色方案

pasted-20

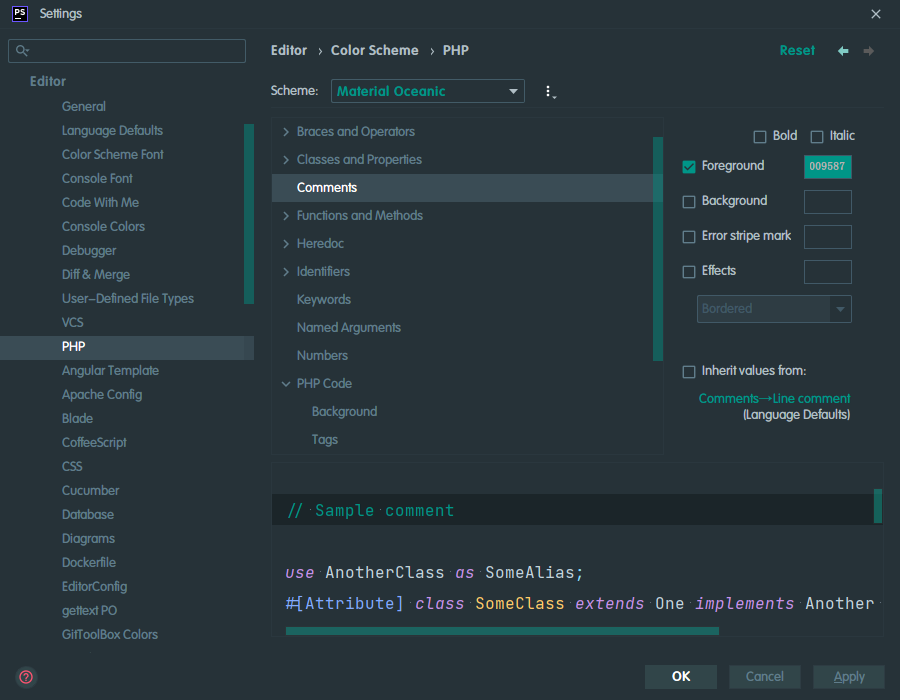
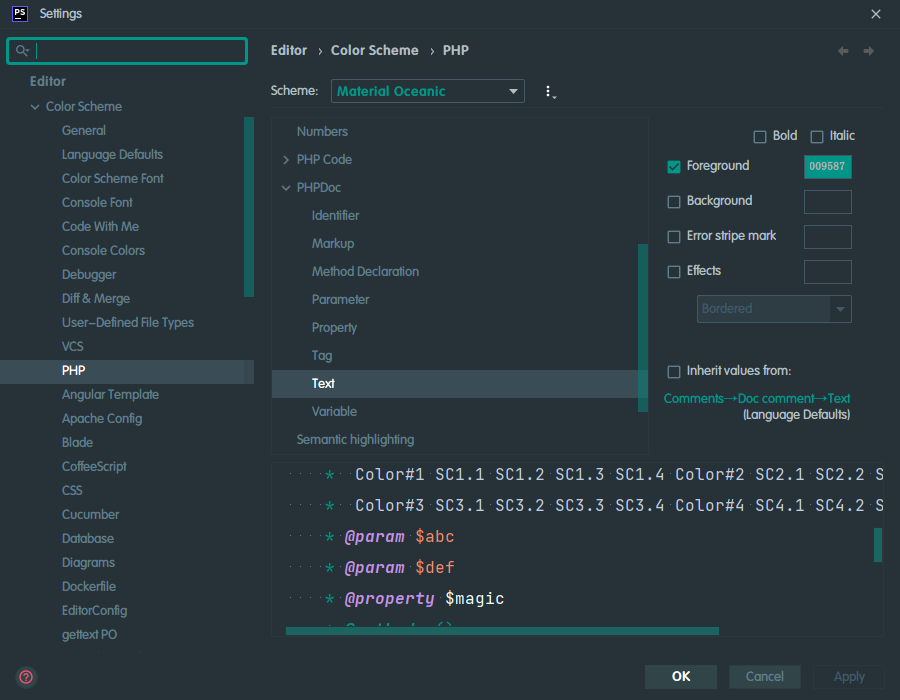
自定义注释颜色(默认是灰色的,个人感觉看着不是很显眼)
pasted-21

pasted-22

Typora

简介

Typora 是一款由 Abner Lee 开发的轻量级 Markdown 编辑器,与其他 Markdown 编辑器不同的是,Typora 没有采用源代码和预览双栏显示的方式,而是采用所见即所得的编辑方式,实现了即时预览的功能,但也可切换至源代码编辑模式。

使用方法

  1. 安装主程序
    打开下载的压缩包,双击 typora-setup-x64-1.2.4.exe 安装。
  2. 覆盖资源文件
    安装完成后,将压缩包的 app.asar 覆盖到安装目录的 resources 文件夹内。
  3. 破解
    打开Typora,点击输入序列号,邮箱随便填,序列号输入
    E8Q9Y5-KXMTL5-7578SL-4S5XKS

下载地址

夸克网盘

0%