调试 Firefox 浏览器发起的网络请求
- 在地址栏输入
about:debugging - 点击
This Firefox - 找到目标扩展 → 点击
Inspect(调试) - 在新打开的开发者工具中,切换到 Network 面板,即可看到该扩展发起的请求
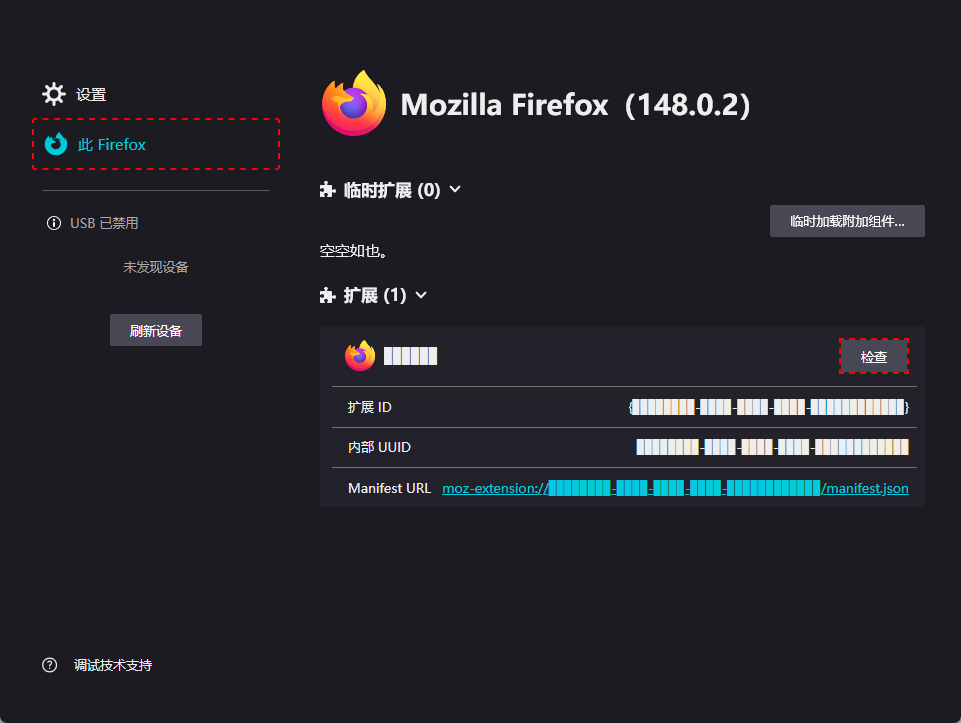
about:debuggingThis FirefoxInspect(调试)

身为开发者,日常在编码时,是不是常被输入法切换问题困扰?写代码时得用英文输入法,添加注释又得切换成中文输入法。反复按 Shift 键或使用组合快捷键,不仅麻烦,还容易打断思路。有时候,因为没注意输入法状态,输入一半才发现错了,只能删除重新输入 ,实在让人抓狂。
Smart Input Pro 就是一款专为解决这些痛点而生的插件,基于 IntelliJ 平台,在 IDEA、WebStorm、PyCharm 等这些大家日常开发常用的工具中,都可以安装使用。它就像一个贴心的智能助手,时刻监控你的输入场景,然后自动帮你在中英文输入法之间进行切换,从此你再也不用手动频繁切换输入法了。
Smart Input Pro 之所以能实现如此智能的切换,得益于其 “场景感知 + 智能决策” 的先进架构。它就像一个聪明的观察者,会实时分析多个关键因素:
光标位置:精确判断你当前输入的位置是在代码区、注释区,还是字符串内。
代码上下文:理解代码的语法结构,知道哪些地方应该是英文代码,哪些地方是中文注释 。比如,当它检测到你在注释区域(单行注释//、多行注释/* */、文档注释/** */ )时,就会自动切换至中文输入法,方便你撰写说明;而在代码区域,则自动切换至英文输入法,确保代码语法正确。
操作行为:留意你的操作动作,比如当你打开 Git 提交框准备填写提交信息时,它能识别提交框焦点,自动切换为中文输入法;当你使用 IdeaVim 模式时,在 NORMAL 模式下自动切换英文,确保命令正确执行。
通过综合分析这些因素,插件能够动态匹配最优输入法,整个过程自然流畅,让你在不知不觉中完成输入状态的切换,将全部的注意力都集中在代码逻辑本身,极大地提升了编码效率和专注度 。
Smart Input Pro 的场景化自动切换功能十分强大,能精准识别各种输入场景,自动帮你切换到最合适的输入法 。
在代码编辑区,当你进入代码编写区域时,插件会迅速反应,自动切换为英文输入法,杜绝中文输入法下误输入全角符号(如 “,”“。”)导致的编译错误,为代码的准确性提供保障。它支持 JavaScript、Java、Vue 等主流语言,对字符串字面量还能进行智能识别。比如,当你输入nameEn="Tom" 时,它能判断这里应保持英文;而当输入nameCn="小明" ,则会自动唤醒中文 ,就像一个熟悉你代码习惯的伙伴,默默帮你处理好输入法的细节。
来到注释与文档区,当你输入单行注释(//)、多行注释(/**/)或 Markdown 文档时,它又会贴心地自动切换为中文输入法,而且完美兼容中英文混合输入场景,让注释撰写无比流畅。以编写 Javadoc 为例,中文描述与英文代码符号能在它的帮助下无缝衔接,你可以专注于内容表达,无需再为输入法切换分神 。
除了上述区域,在工具窗口与特殊场景中,它也能发挥作用。比如在 Git 提交框,当你输入 Commit Message 时,它自动切为中文,方便你规范地撰写中文提交说明;在终端(Terminal)/Project 窗口,它会强制英文输入,避免命令行中混入中文字符,保证命令执行顺畅;如果你使用 IdeaVim 模式,在 NORMAL 模式它自动切换为英文,INSERT 模式则按当前编辑场景智能切换,让 Vim 操作与输入法切换配合默契 。
为了让你随时了解当前的输入状态,Smart Input Pro 还提供了可视化状态反馈功能。
其中,三色光标提示十分直观,蓝色光标代表英文小写,紫色光标表示英文大写,红色光标则意味着中文输入 。在编码过程中,你无需将视线移至系统状态栏,只要看一眼光标颜色,就能快速确认输入状态,大大减少了误操作的概率。比如,当你看到红色光标时,就知道当前是中文输入法状态,可以放心输入中文内容;而看到蓝色光标,就明白现在适合输入英文代码 。
此外,还有轻量浮动标签,它会在光标附近显示 “EN” 或 “中文” 微型标签,这个标签支持自定义位置与透明度。你可以根据自己的习惯,将它调整到既不遮挡视线,又能轻松看到的位置,还能根据个人喜好设置透明度,兼顾提示性与无干扰性,让你在编码时随时掌握输入状态 。
每个人的编码习惯和项目需求都有所不同,Smart Input Pro 充分考虑到这一点,提供了高度可定制化的功能。
通过自定义正则匹配,你可以轻松定义特殊场景。例如,针对 i18n 相关文件(*.zh-CN.vue),你可以通过正则表达式让插件强制中文输入,确保国际化文件中的中文内容输入顺畅;或者在 SQL 脚本中,识别中文注释块并自动切为中文,满足特定的编程需求 。只需要简单编写正则表达式,就能让插件按照你的想法工作 。
它还有强大的输入法记忆机制。当你手动切换输入法后,插件会自动学习你的习惯。比如,在特定文件类型中,你偏好某种输入状态,它就会记住这个习惯,逐步优化切换策略,随着使用时间的增加,它会越来越 “懂你” ,让输入法的切换更加贴合你的使用习惯,为你打造个性化的编码输入环境 。
安装 Smart Input Pro 的过程非常简单,无论你是在线安装还是离线安装,都能轻松完成。
如果你选择在线安装,在 IDE 内打开插件市场,这就好比是一个插件的大超市,里面摆满了各种各样的插件 。在搜索框中输入 “Smart Input Pro”,就像在超市里寻找特定的商品一样,很快就能找到它。找到后,点击安装按钮,插件就会自动下载并安装到你的 IDE 中。安装完成后,按照提示重启 IDE,整个过程无需手动配置,就像拿到一个新的电子产品,打开就能用,真正做到了开箱即用 。
要是你处于网络受限的环境,也不用担心,还可以选择离线安装。你可以从 JetBrains 插件市场下载对应版本的 ZIP 文件,这个文件就像是一个装满插件的包裹 。下载好后,通过 “Install Plugin from Disk”(从磁盘安装插件)选项将下载的 ZIP 文件导入到 IDE 中,就像把包裹里的东西放进你的电脑里一样简单,轻松解决网络问题带来的困扰 。
安装完成后,还需要进行一些基础配置,让插件更好地适应你的使用习惯 。
首先是选择默认中文输入法,在插件设置中,你可以指定自己常用的中文输入法,比如大家常用的搜狗输入法、百度输入法等 。这就像是给插件设定一个语言助手,让它知道你平时喜欢用哪种中文输入法,这样它就能在需要的时候精准地帮你切换,确保输入法的切换符合你的习惯 。
对于不同系统的用户,它还有一些专属的跨平台适配设置。Windows 用户可以启用 “离开 IDE 恢复系统输入法” 功能,当你离开 IDE 去做其他事情,再回到 IDE 时,输入法会自动恢复到你离开前在 IDE 中的设置,就像 IDE 记住了你离开时的输入法状态一样 。而 Mac 用户则更方便,插件支持全局输入法状态记忆,当你在不同应用之间切换时,它会自动还原你的输入环境,比如你从 IDE 切换到浏览器,再切回 IDE,输入法还是你在 IDE 中使用时的状态,让你的输入体验更加流畅 。
如果你想要进一步发挥插件的强大功能,还可以进行进阶设置 。
通过自定义场景规则,你可以打造适合自己的输入逻辑。进入 “Settings> Smart Input Pro > Custom Rules”(设置 > Smart Input Pro > 自定义规则),在这里,你可以针对特定的文件路径、代码块结构添加专属的切换逻辑 。比如,在一个 Vue 项目中,你希望 Vue 模板中的中文文案区域始终保持中文输入,就可以在这里进行设置。通过编写规则,让插件识别 Vue 模板文件,当光标进入中文文案区域时,自动切换并保持中文输入法状态,让你的代码编写更加高效 。
对于使用低配设备的开发者,为了平衡智能度与流畅度,还可以开启 “轻量模式” 。开启后,插件会降低资源占用,就像给插件 “瘦身” 一样,让它在低配设备上也能轻松运行,不会因为占用过多资源而导致设备卡顿,让你在享受智能输入的同时,也能保证设备的流畅运行 。
为了让大家更直观地感受到 Smart Input Pro 带来的效率提升,我们来看一下实际开发场景中使用插件前后的对比 。
在未使用插件之前,开发过程中充满了各种因输入法切换带来的困扰。就拿编写代码来说,平均每 5 分钟,我就会因为输入法的问题而出现 1 次输入状态错误。比如在定义变量名时,本应使用英文输入法输入字母,却因为疏忽还停留在中文输入法状态,结果输入了全角字符,导致代码出现语法错误 。在添加注释时,也经常会因为没有及时切换输入法,使得注释中混入英文符号,或者在代码中出现中文标点,这不仅影响了代码的可读性,还需要花费额外的时间去反复检查修正 。
而使用 Smart Input Pro 插件后,情况就大不一样了 。在代码区,它会自动切换为英文输入法,确保我输入的代码准确无误;在注释区,又会自动切换为中文输入法,让我可以流畅地撰写注释 。就连在 Git 提交时,也无需手动切换输入法,直接就能用中文输入提交信息 。根据我的统计,使用插件后,日均减少了 200 + 次无效切换操作,编码时的专注度也提升了 30% ,真正实现了从低效到高效的转变 。
接下来,以 Vue 开发为例,为大家详细演示一下 Smart Input Pro 插件的具体使用过程 。
在<template>标签内编写代码时,当我输入v-model,准备补全变量名,此时插件会保持英文输入法状态,让我可以毫无干扰地输入英文变量名 。比如输入v-model="userName" ,整个输入过程非常流畅,不用担心输入法的问题 。
当切换到<script>的注释区域,我输入// 按钮点击事件 ,插件会自动切换为中文输入法,我可以直接输入中文描述,快速完成注释内容的编写 。像// 点击按钮后,调用接口获取数据 ,轻松就能完成输入 。
当打开 Git 提交窗口,准备输入提交信息时,比如输入 “修复表单验证逻辑” ,此时无需手动切换输入法,因为插件已经自动将输入法切换为中文,直接输入即可,大大提高了提交效率 。
进入终端输入npm run dev时,插件会强制将输入法切换为英文,避免因为误输入中文而导致命令错误 。即使我不小心按下了中文输入法快捷键,插件也能迅速调整回来,确保命令的正确执行 。
效率提升显著:在日常开发中,我们常常会因为频繁切换输入法而打断思路,降低编码效率 。而 Smart Input Pro 的自动切换功能十分强大,它能够覆盖 90% 以上的常规场景,让我们无需手动切换输入法,从而将更多的时间和精力投入到代码的编写中。以我个人的使用体验为例,在使用该插件之前,我每天需要花费大量的时间在输入法切换上,而使用之后,这些时间被节省了下来,我可以更加专注地思考代码逻辑,编码效率得到了大幅提升 。
错误预防能力:在代码编写过程中,因符号错误导致的编译问题是我们经常会遇到的困扰 。而 Smart Input Pro 通过场景化输入法控制,能够有效地避免这类问题的发生。它会在我们输入代码时,自动切换为英文输入法,确保我们输入的符号都是正确的;而在输入注释时,又会自动切换为中文输入法,方便我们撰写注释 。根据实际使用情况统计,使用该插件后,因符号错误导致的编译问题降低了 80%+,大大提高了代码的质量和开发效率 。
学习成本极低:对于开发者来说,学习新工具的成本是一个重要的考虑因素 。而 Smart Input Pro 的默认配置即满足多数需求,即使是初次使用的用户,也能快速上手。对于一些进阶功能,它还提供了图形化界面操作,我们只需要通过简单的设置,就能轻松实现个性化的需求,无需编写复杂的规则 。这使得我们能够在短时间内熟练掌握插件的使用方法,快速提升编码效率 。
硬件兼容性:在配置较低的电脑上,当我们处理复杂项目时,Smart Input Pro 可能会出现轻微光标延迟的情况 。这是因为插件在运行过程中需要占用一定的系统资源,而配置较低的电脑可能无法满足其需求 。不过,我们可以通过开启轻量模式来缓解这一问题。轻量模式下,插件会降低对系统资源的占用,从而提高运行的流畅度 。虽然开启轻量模式后,插件的一些智能功能可能会受到一定影响,但对于配置较低的电脑用户来说,这仍然是一个不错的解决方案 。
高级功能付费:Smart Input Pro 的高级功能,如自定义正则匹配、多设备同步等,需要订阅专业版才能使用 。对于一些对功能要求较高的用户来说,这可能会增加一定的使用成本 。专业版的月费约 10 元,虽然价格不算高,但对于一些个人开发者或小型团队来说,可能还是会有些犹豫 。不过,免费版已经包含了核心切换功能,能够满足大多数用户的日常需求 。如果用户对高级功能的需求不是很迫切,那么使用免费版也完全可以 。
中文开发者:如果你是一位中文开发者,日常开发中需要频繁在代码与中文注释、文档间切换,那么 Smart Input Pro 绝对是你的得力助手。它能自动识别输入场景,在代码区自动切换为英文输入法,在注释和文档区自动切换为中文输入法,让你无需手动切换,专注于代码的编写和逻辑的实现 。尤其是对于 Java、前端、全栈等领域的开发者,这款插件的实用性更强,能够有效提高你的开发效率 。
效率敏感型开发者:对于那些追求高效开发,希望减少重复性操作,将更多精力聚焦于逻辑实现而非工具切换的人群来说,Smart Input Pro 无疑是一个绝佳的选择 。它的自动切换功能能够极大地减少无效操作,让你在编码过程中保持流畅的思路,将更多的时间和精力投入到真正有价值的工作中 。
Vim/Emacs 用户:如果你是 Vim/Emacs 用户,在使用 IDEA 等开发工具时,常常被 IDE 快捷键与输入法切换间的频繁冲突所困扰,那么 Smart Input Pro 可以完美解决你的问题 。它能够与 IdeaVim 等模式完美适配,在 NORMAL 模式下自动切换英文,确保命令正确执行;在 INSERT 模式下则按当前编辑场景智能切换,让你的 Vim 操作与输入法切换配合得更加默契 。
在 Windows 11 下使用 WSL2 开发 PHP 项目时,断点调试是提升效率的关键。本文将详细讲解如何基于 Alpine Linux v3.18 配置 PhpStorm + XDebug 环境,解决版本兼容、路径映射、调试连接等核心问题,适用于 Hyperf、Laravel 等主流 PHP 框架。
先明确本地开发环境的核心信息,避免后续配置因版本不匹配导致失败:
| 组件 | 版本/信息 | 说明 |
|---|---|---|
| 宿主机系统 | Windows 11 | 需已启用 WSL2(需先开启虚拟机平台功能) |
| WSL2 发行版 | Alpine Linux v3.18 | 已更换阿里云源(安装速度更快) |
| PHP 版本 | 8.1.2 | 需与 XDebug 版本兼容 |
| XDebug 版本 | 3.2.2 | 对应 PHP 8.1 的 PECL 包 |
| 调试框架示例 | Hyperf 3.x | 也适用于 Laravel、ThinkPHP 等 |
| PhpStorm 版本 | 2023.x 及以上 | 确保支持 XDebug 3.x |
在开始配置前,需完成以下基础操作:
wsl 命令启动。1 | # 编辑源配置文件 |
php -v,确保输出 PHP 8.1.2 信息(若未安装,需先通过 apk add php81 php81-cli php81-common 安装)。XDebug 需通过 Alpine 的 PECL 仓库安装,且必须选择与 PHP 版本匹配的包(PHP 8.1 对应 php81-pecl-xdebug)。
先确认仓库中是否有对应 PHP 版本的 XDebug:
1 | apk search xdebug |
输出结果中需包含 php81-pecl-xdebug-3.2.2-r0(若显示 php82-* 则为 PHP 8.2 版本,请勿安装,避免版本不兼容)。
执行安装命令,Alpine 会自动处理依赖:
1 | apk add php81-pecl-xdebug |
安装成功后,执行以下命令验证是否加载 XDebug 扩展:
1 | php -v |
若输出中包含 with Xdebug v3.2.2,说明安装成功:
1 | PHP 8.1.2 (cli) (built: Feb 1 2023 12:05:42) (NTS) |
XDebug 3.x 与 2.x 配置差异较大,需编辑专属配置文件,核心是指定「调试模式」「宿主机地址」「端口」。
Alpine 中 PHP 8.1 的 XDebug 配置文件路径固定为:
1 | vi /etc/php81/conf.d/50_xdebug.ini |
将以下内容复制到文件中,每个配置项都有详细注释,无需额外修改(host.docker.internal 是 WSL2 内置的「宿主机 IP 别名」,无需手动查宿主机 IP):
1 | ; 启用 XDebug 扩展(必须放在最前面) |
配置后需重启 PHP 服务(若用 Hyperf 等框架,重启服务即可),并执行以下命令确认配置:
1 | php -i | grep XDebug |
输出中需包含 xdebug.mode => debug,develop xdebug.client_port => 9003 等信息,说明配置正确。
需在 WSL 中设置 PHP_IDE_CONFIG 环境变量,指定 PhpStorm 中配置的「服务器名称」,确保路径映射生效。
执行以下命令,将环境变量添加到 ~/.bashrc(若用 Zsh 则改为 ~/.zshrc):
1 | # 写入环境变量(SomeName 可自定义,后续 PhpStorm 需用相同名称) |
执行 echo $PHP_IDE_CONFIG,输出 serverName=SomeName 即成功。
PhpStorm 需配置「PHP 解释器」「服务器」「XDebug 端口」,核心是解决「WSL 路径与 Windows 路径映射」问题(断点不命中的常见原因)。
File > Settings > PHP(Windows/Linux)或 PhpStorm > Settings > PHP(Mac)。... → 点击左上角 + → 选择「From Docker, Vagrant, WSL, Remote…」。/usr/bin/php81)→ 点击「OK」。File > Settings > PHP > Servers → 点击左上角 +,配置以下信息:SomeName(必须与 WSL 中 serverName 一致!)。127.0.0.1,Laravel 项目可能为 localhost)。9501,Laravel 默认 8000)。XDebug。D:\projects\hyperf-demo)。/home/user/hyperf-demo)。File > Settings > PHP > Debug > XDebug。9003(与 WSL 中 xdebug.client_port 一致)。PhpStorm 需要主动「侦听」WSL 发送的调试请求,步骤如下:
Shift + F9。在 Windows 中打开「命令提示符(CMD)」,执行以下命令查看 9003 端口是否被 PhpStorm 占用:
1 | netstat -ano | findstr 9003 |
若输出以下内容(LISTENING 状态),说明侦听正常:
1 | TCP 0.0.0.0:9003 0.0.0.0:0 LISTENING 31268 # 31268 是 PhpStorm 进程 ID |
以 Hyperf 项目为例,在 WSL 中启动项目,然后验证 PhpStorm 与 WSL 的连接。
进入项目根目录,执行启动命令(不同框架命令不同):
1 | # Hyperf 项目启动命令 |
启动成功后输出:
1 | [INFO] Worker#0 started. |
再次执行端口监听命令,查看是否出现「ESTABLISHED」状态(表示 WSL 与 PhpStorm 已建立连接):
1 | netstat -ano | findstr 9003 |
成功连接的输出:
1 | TCP 0.0.0.0:9003 0.0.0.0:0 LISTENING 31268 |
连接成功后,即可通过断点调试查看变量、调用栈等信息,以 Hyperf 控制器为例:
app/Controller/IndexController.php,在 index 方法的第一行代码左侧点击,出现红色圆点(断点)。http://127.0.0.1:9501(Hyperf 默认接口),或用 Postman 发送请求。F8:单步执行(跳过函数内部)。F7:单步进入(进入函数内部)。Shift + F8:单步跳出(从函数内部跳出)。F9:继续执行(直到下一个断点)。\,WSL 路径带 /)。php -i | grep XDebug,确认 xdebug.mode 包含 debug,xdebug.client_host 为 host.docker.internal。netstat -ano | findstr 9003 查看是否有其他进程占用 9003 端口,若有则修改 xdebug.client_port 为其他端口(如 9004),并同步更新 PhpStorm 配置。xdebug.client_host 为 Windows 的局域网 IP,如 192.168.1.100)。xdebug.log=/var/log/xdebug.log,查看日志中的错误信息(如 Could not connect to client host)。php -v 不显示 XDebug 信息 → 确保安装的 XDebug 包与 PHP 版本匹配(PHP 8.1 对应 php81-pecl-xdebug,PHP 8.2 对应 php82-pecl-xdebug)。通过以上步骤,即可在 Windows 11 + WSL2(Alpine)环境下实现 PhpStorm 与 XDebug 的无缝调试。核心是「版本匹配」「路径映射」「端口一致」三个关键点,遇到问题时优先查看 XDebug 日志和端口监听状态,大部分问题可快速定位解决。
Superfetch,直译为 “超级预取” ,是 Windows 系统中的一项智能服务,最早在 Windows Vista 系统中引入,后续的 Windows 7、Windows 8 以及 Windows 10 等系统版本也都沿用了这一功能,其核心作用在于提升系统和应用程序的运行速度。
它的运行原理基于对用户使用习惯的深度学习与分析。当我们日常使用电脑时,Superfetch 会在后台默默监控我们频繁开启的各类程序。一旦它 “熟悉” 了我们的使用模式,就会将这些常用程序运行时所依赖的数据和代码,提前加载到内存之中。就好比你每天早上出门前,会提前把当天要用的文件准备好放在包里,等真正需要的时候,就能迅速拿出来使用,无需再临时翻找。
举个简单的例子,假如你每天上班打开电脑后的第一件事就是启动微信与同事沟通工作,那么 Superfetch 服务就会 “记住” 这个习惯。在你下次开机时,它会提前将微信运行所需的关键文件和数据从硬盘读取到内存里。这样一来,当你点击微信图标时,程序便能从内存中快速获取所需内容,实现几乎瞬间启动,大大节省了等待时间,让你的工作衔接更加顺畅高效。又或者你经常使用 Photoshop 处理图片,Superfetch 也会将 Photoshop 运行时可能用到的图像算法库、常用滤镜数据等提前加载,使得你在启动 Photoshop 以及使用各种功能时,响应速度明显加快,创作过程更加流畅。
不过,Superfetch 在发挥作用的过程中,也会对系统资源产生一定的占用。它需要消耗一定的 CPU 运算资源来分析用户行为模式,同时还会占用一部分内存空间用于存放预读取的数据,这也是我们在考虑是否禁用它时需要权衡的因素。
尽管 Superfetch 服务出发点是好的,旨在提升系统性能,但在实际使用中,不少用户却萌生出禁用它的想法,这背后有着多方面的原因。
Superfetch 服务在运行过程中,对系统资源有着较高的需求。它需要持续分析用户的使用习惯,这一过程会占用一定的 CPU 资源,尤其是在系统刚刚启动或者用户使用习惯发生较大变化时,CPU 的占用率会明显上升,导致电脑在这段时间内反应迟缓,打开其他程序时也会出现卡顿现象。比如,当你早上开机后,想要快速打开多个办公软件开始一天的工作,却发现电脑变得异常迟钝,很可能就是 Superfetch 服务在后台大量占用 CPU 资源,使得其他程序无法及时获取足够的运算资源来启动。
同时,Superfetch 会将预读取的数据存储在内存中,这无疑会占用相当一部分内存空间。对于那些内存容量本身就不大的电脑来说,这可能会导致系统内存紧张。当内存不足时,系统会频繁地进行内存与硬盘之间的数据交换,也就是我们常说的 “虚拟内存” 操作,这会大大降低系统的运行效率,使电脑整体变得卡顿,严重影响用户体验。
在固态硬盘(SSD)普及之前,Superfetch 服务对于提升机械硬盘的读取速度效果显著。因为机械硬盘的读写速度相对较慢,通过预读取数据到内存,可以有效减少等待时间。然而,随着 SSD 的广泛应用,情况发生了变化。SSD 采用闪存芯片作为存储介质,其随机读写速度比机械硬盘快了数倍甚至数十倍,能够在极短的时间内读取大量数据。在这种情况下,Superfetch 服务提前预取数据的优势就不再那么明显,其对系统性能的提升效果变得微乎其微。许多用户发现,即使禁用了 Superfetch 服务,使用 SSD 的电脑在程序启动速度和系统响应速度上依然表现出色,并没有因为缺少了 Superfetch 的预取功能而受到明显影响。
有时候,Superfetch 服务可能会出现异常情况,导致硬盘占用率居高不下。这是因为它在预取数据时,可能会频繁地对硬盘进行读写操作。当硬盘的读写任务过于繁重时,就会出现 100% 占用的情况,此时电脑会变得异常卡顿,几乎无法进行正常操作。比如,你正在使用电脑进行视频剪辑或者玩大型游戏,突然发现电脑变得反应迟缓,打开文件或者切换程序都要等待很长时间,查看任务管理器后发现硬盘占用率达到了 100%,而罪魁祸首很可能就是 Superfetch 服务。这种异常情况不仅会影响当前正在进行的工作和娱乐,还可能对硬盘的寿命产生一定的影响。
不同版本的 Windows 系统,禁用 Superfetch 服务的方法略有差异,下面分别为大家介绍 Windows 7、Windows 10 和 Windows 11 系统下的具体操作步骤。
打开服务管理器:同时按下键盘上的Win + R组合键,调出 “运行” 对话框,在对话框中输入services.msc,然后按下回车键Enter,即可打开服务管理器窗口。
找到 Superfetch 服务:在服务管理器窗口中,会显示出众多系统服务,这些服务按照字母顺序排列。我们需要在列表中仔细查找名为 “Superfetch” 的服务。
停止 Superfetch 服务:找到 “Superfetch” 服务后,双击该服务,打开其属性窗口。在属性窗口的 “常规” 标签页中,将 “启动类型” 从原来的 “自动” 设置为 “已禁用”。设置完成后,点击 “停止” 按钮,此时 Superfetch 服务就会停止运行。
保存设置:点击 “确定” 按钮,保存我们所做的更改设置。这样,在下次系统启动时,Superfetch 服务就不会自动运行了。
打开计算机管理:在 Windows 10 桌面,右键点击 “此电脑” 图标,在弹出的菜单中选择 “管理” 菜单项,即可打开计算机管理窗口。
进入服务选项:在打开的计算机管理窗口中,点击左侧列表中的 “服务和应用程序” 一项,展开该项后,再点击 “服务” 菜单项 ,此时在窗口右侧会显示出所有的系统服务列表。
找到并设置 Superfetch 服务:在服务列表中找到 “superfetch” 一项,双击它打开 “superfetch” 的属性窗口。首先点击 “停止” 按钮,关闭当前正在运行的 superfetch 服务。然后为了防止下次开机时该服务自动启动,点击 “启动类型” 下拉菜单,在弹出的菜单中选择 “禁用” 菜单项。
确认保存:完成上述设置后,点击 “确定” 按钮保存设置,关闭属性窗口即可。
使用服务应用程序:按下Windows+S组合键启动 “搜索” 菜单,在顶部的文本字段中输入 “服务”,然后单击相关搜索结果。在打开的服务窗口中找到 “SysMain” 条目(在 Windows 11 中 Superfetch 服务改名为 SysMain ),右键单击它,然后从上下文菜单中选择 “属性”,或者直接双击该服务。在弹出的属性窗口中,单击 “启动类型” 下拉菜单,然后从选项列表中选择 “禁用”。接下来,如果当前服务正在运行,请单击 “服务状态” 下的 “停止” 按钮,最后单击底部的 “确定” 以保存更改。完成后重新启动计算机,以使更改生效。
使用命令提示符:按下Windows+S组合键启动搜索菜单,在文本字段中输入 “终端”,右键单击相关搜索结果,然后从上下文菜单中选择 “以管理员身份运行”。在弹出的用户帐户控制(UAC)提示中单击 “是”。单击顶部的向下箭头,然后选择 “Command Prompt”(命令提示符)。或者,也可以按下Ctrl+Shift+2组合键在新选项卡中启动命令提示符。在命令提示符窗口中,粘贴以下命令并点击Enter键停止服务:net.exe stop sysmain。接着,执行以下命令以禁用 Superfetch 在启动时加载:sc config sysmain start=disabled。
使用注册表编辑器:按下Windows+R组合键启动运行命令,在文本字段中输入regedit,然后单击 “确定” 或点击Enter键启动注册表编辑器。在弹出的 UAC 提示中单击 “是”。在注册表编辑器中,将以下路径粘贴到顶部的地址栏中,然后点击Enter键,或者也可以使用左侧的导航窗格依次展开路径:Computer\HKEY_LOCAL_MACHINE\SYSTEM\CurrentControlSet\Control\Session Manager\Memory Management\PrefetchParameters。在该路径下,右键单击空白区域,将光标悬停在 “新建” 上,然后从上下文菜单中选择 “DWORD(32 位)值”。将该条目命名为 “EnableSuperfetch”,然后双击它以修改属性。在 “数值数据” 下的文本字段中输入 “0” ,然后单击 “确定” 以保存更改。进行更改后,重新启动计算机以使更改生效。不过使用注册表编辑器时需格外小心,错误的修改可能会导致系统出现严重问题。
禁用 Superfetch 服务,犹如在电脑的系统生态中做出一次关键的 “调整”,这一操作会带来多方面的影响,既可能有性能提升的惊喜,也可能伴随着一些负面效应,需要我们全面客观地去看待。
释放系统资源:正如前文所提到的,Superfetch 服务在运行时会占用一定的 CPU 和内存资源。当我们禁用它后,这些被占用的资源将被释放出来,可供其他程序使用。对于那些配置相对较低的电脑而言,这无疑是个好消息。例如,一台只有 4GB 内存的笔记本电脑,在禁用 Superfetch 服务后,原本被其占用的几百 MB 内存得以释放,电脑在运行多个程序时,内存不再那么紧张,程序之间的切换也变得更加流畅,不容易出现因内存不足而导致的卡顿现象。
减少硬盘读写:Superfetch 服务为了实现预取功能,会频繁地对硬盘进行读写操作。尤其是在系统启动和程序运行初期,这种读写操作更为明显。禁用该服务后,硬盘的读写负担将大大减轻。对于使用机械硬盘的电脑来说,这可以有效减少硬盘的磨损,延长硬盘的使用寿命;而对于固态硬盘,虽然其读写速度快,但减少不必要的读写操作也有助于降低固态硬盘的写入放大效应,从而延长其寿命,同时也能减少因硬盘读写而产生的热量。
特定场景下的性能提升:在某些特定场景中,禁用 Superfetch 服务能够显著提升系统性能。比如,对于一些追求极致游戏性能的玩家来说,在玩大型游戏时,禁用 Superfetch 服务可以避免其在后台占用资源,使游戏能够获得更多的系统资源,从而提升游戏的帧率和稳定性,减少游戏过程中的卡顿现象,让玩家能够更加流畅地享受游戏带来的乐趣。又或者对于从事视频剪辑、3D 建模等对系统性能要求较高的专业用户来说,禁用 Superfetch 服务后,他们在使用这些专业软件时,软件的响应速度会更快,操作更加流畅,能够大大提高工作效率。
系统启动和程序加载变慢:Superfetch 服务的核心作用是提前预取系统和程序运行所需的数据,从而加快系统启动和程序加载速度。一旦禁用它,系统在启动时就无法提前将常用程序的数据加载到内存中,程序在启动时也需要从硬盘中实时读取数据,这必然会导致系统启动时间变长,程序的首次加载速度明显变慢。例如,原本开机后几秒钟就能快速启动的微信,在禁用 Superfetch 服务后,可能需要等待十几秒甚至更长时间才能打开,这对于那些追求高效、希望能够快速进入工作或娱乐状态的用户来说,无疑是一种困扰。
内存管理可能受影响:Superfetch 服务在一定程度上参与了系统的内存管理,它通过分析用户的使用习惯,合理地将数据预加载到内存中,使得内存的使用更加高效。当禁用该服务后,系统的内存管理可能会受到一定影响。内存中可能无法及时存放常用程序的数据,导致程序在运行过程中频繁地进行内存与硬盘之间的数据交换,增加了系统的负担,进而可能影响到系统的整体性能和稳定性,使电脑在运行多个程序时容易出现卡顿现象。
影响用户体验:从整体用户体验的角度来看,禁用 Superfetch 服务带来的启动和加载变慢问题,可能会让用户在日常使用电脑的过程中感到烦躁和不便。尤其是在当今快节奏的生活和工作环境下,时间的碎片化使得用户希望每一次使用电脑都能够快速、高效地完成任务,而这种等待时间的增加无疑与用户的期望背道而驰,可能会降低用户对电脑使用的满意度 。
禁用 Superfetch 服务并非适用于所有用户和所有电脑,在决定是否禁用之前,我们需要综合多方面因素进行判断,找到最适合自己电脑的设置方案 。
低配置电脑:如果你的电脑配置较低,例如 CPU 性能较弱、内存容量较小(4GB 及以下),且使用的是机械硬盘,那么禁用 Superfetch 服务可能会为你带来一定的性能提升。因为这类电脑本身资源有限,Superfetch 服务占用的资源可能会对其他程序的运行产生较大影响。禁用它后,可以释放出更多的系统资源,让电脑运行更加流畅。
高配置电脑:对于高配置电脑,如配备高性能 CPU、大容量内存(16GB 及以上)以及快速的固态硬盘,Superfetch 服务所占用的资源相对来说对系统整体性能的影响较小。在这种情况下,保留 Superfetch 服务可能会使系统和程序的启动速度更快,用户体验更好,因此不一定需要禁用它。
固定使用场景:如果你每天使用电脑的场景比较固定,总是运行相同的几个程序,那么 Superfetch 服务能够很好地发挥其预取作用,提前加载常用程序,减少等待时间。这种情况下,保留该服务会更符合你的使用需求。比如,你是一名上班族,每天主要使用办公软件(Word、Excel、PPT)、通讯工具(微信、QQ)以及浏览器进行工作,Superfetch 服务能够根据你的使用习惯,提前将这些程序所需的数据加载到内存中,让你能够快速进入工作状态。
频繁切换使用场景:然而,如果你经常在不同的使用场景之间切换,运行各种不同类型的程序,Superfetch 服务可能无法及时准确地预取到你需要的数据。因为它需要一定的时间来分析你的新使用习惯并进行预取,在这种频繁变化的情况下,其预取效果可能并不理想,此时禁用它可能不会对你的使用造成太大影响。
系统卡顿明显:如果你在日常使用电脑的过程中,经常遇到系统卡顿、反应迟缓的情况,并且通过任务管理器等工具发现 Superfetch 服务占用了大量的 CPU、内存或硬盘资源,那么可以尝试禁用该服务,观察系统性能是否有所改善。例如,在打开多个程序时,电脑出现长时间无响应,查看任务管理器发现 Superfetch 服务占用了较高的 CPU 资源,此时禁用它可能会使系统恢复流畅。
系统运行流畅:相反,如果你的电脑在运行过程中一直表现得很流畅,系统和程序的启动速度也能满足你的需求,那么就没有必要冒险去禁用 Superfetch 服务,以免带来不必要的负面影响。
禁用 Superfetch 服务,是一把双刃剑,有着明显的利弊两面。从积极的方面来看,它能够释放系统资源,减少对 CPU、内存和硬盘的占用,尤其对于低配置电脑以及机械硬盘,在一定程度上可提升系统运行的流畅度,降低硬盘的读写负担,延长硬盘使用寿命。同时,在特定的使用场景下,比如追求极致游戏性能或专业软件运行效率时,能让电脑将更多资源集中于关键任务,带来更好的性能表现。
然而,我们也不能忽视其负面效应。禁用 Superfetch 服务后,系统启动和程序加载速度会明显变慢,这会在日常使用中增加等待时间,降低工作和娱乐的效率。而且,它还可能影响系统的内存管理机制,导致内存使用不够合理,进而影响系统的整体稳定性和性能。
对于不同用户群体,建议如下:如果你的电脑配置较低,且使用场景较为单一,日常主要运行少数几个固定程序,那么可以尝试禁用 Superfetch 服务,通过释放系统资源来提升电脑的运行流畅度。但在操作之前,务必备份好重要数据,以防万一。
而对于高配置电脑用户,若电脑在运行过程中没有出现明显的资源不足或卡顿问题,保留 Superfetch 服务通常能获得更便捷、高效的使用体验,因为它可以让系统和程序的启动更加迅速。
总之,是否禁用 Superfetch 服务,需要我们根据自身电脑的实际配置、使用习惯以及系统性能表现等多方面因素,进行全面、谨慎的考虑和权衡。在操作过程中,一定要谨慎行事,尤其是涉及到修改系统服务和注册表等关键设置时,以免因不当操作导致系统出现严重问题,影响正常使用。
在 Alpine Linux 环境中使用 PhpStorm 的 Git 工具时,部分开发者可能会遇到以下错误提示,导致版本控制功能无法正常使用。本文将详细分析问题成因并提供分步解决方案。
当尝试在 PhpStorm 中更新代码或执行 Git 操作时,控制台会抛出以下异常:
1 | Error updating changes: setsid: unrecognized option: w |
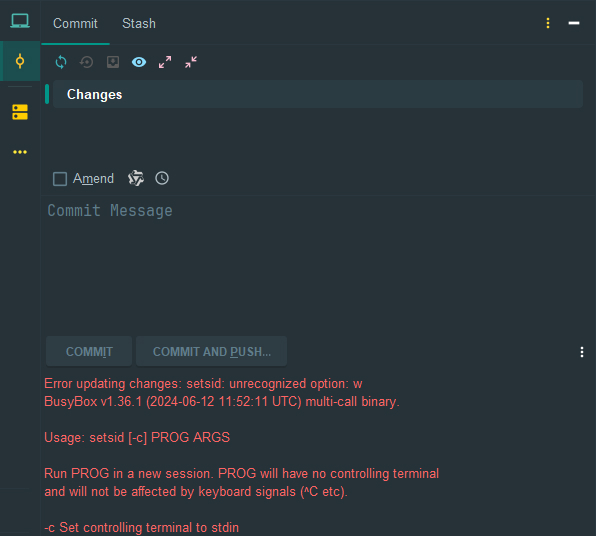
关键问题点:BusyBox 提供的 setsid 命令不支持-w选项,而 PhpStorm 的 Git 工具可能默认调用了该参数,导致命令执行失败。
Alpine Linux 默认使用 BusyBox 工具集,其内置的setsid命令仅支持-c选项(设置控制终端),但 PhpStorm 等 IDE 的 Git 插件可能依赖 GNU Core Utilities 中的setsid命令(支持更多选项,如-w)。由于 BusyBox 的setsid与 GNU 版本存在兼容性差异,导致 IDE 调用时参数不匹配。
以下操作需在终端中以管理员权限(sudo)执行,逐步修复命令冲突问题:
1 | cd /usr/bin/ |

setsid实际指向 BusyBox 的busybox二进制文件(通过软链接setsid2)。1 | mv setsid setsid2 |
setsid与后续安装的 GNU 版本冲突。Alpine 默认仓库中的coreutils包提供 GNU 版本的工具集,执行以下命令安装并复制setsid:
下载地址:setsid
1 | cp setsid /usr/bin/setsid |
注意:若coreutils安装后setsid路径不同(如/usr/bin/setsid已存在),请根据实际路径调整拷贝命令。
1 | chmod 777 /usr/bin/setsid |

setsid: unrecognized option: w错误,则说明修复成功。setsid -w echo test,若正常输出test且无报错,表明 GNU 版本的setsid已生效。setsid为 GNU 版本,解决 IDE 参数调用不兼容问题。setsid2到其他目录)。coreutils并替换对应命令解决。通过以上步骤,即可在 Alpine 系统中恢复 PhpStorm 的 Git 工具正常使用,确保开发流程不受环境差异影响。
递归公用表表达式(Recursive CTE)是 MySQL 8.0 引入的高级特性,通过WITH RECURSIVE语法定义,允许在 CTE 内部递归引用自身,专门用于处理具有层级关系的树形数据,如组织架构、分类目录、文件系统等。其核心思想是通过锚成员(初始查询)和递归成员(迭代查询)的结合,逐层扩展结果集,直至满足终止条件(递归成员返回空集)。
组织架构管理:查询某个部门的所有上下级节点。
分类目录遍历:获取商品分类的全层级路径。
树状结构分析:查找节点的所有祖先或后代,替代传统自连接或存储过程的复杂逻辑。
1 | WITH RECURSIVE cte_name (column_list) AS ( |
锚成员执行:生成初始结果集(R0),如指定节点的基础信息。
递归迭代:将上一次结果集(Ri)作为输入,通过UNION ALL合并新生成的结果集(Ri+1),直到递归成员返回空集。
终止条件:隐式终止于递归成员无数据返回,或显式通过条件(如WHERE n < 100)限制递归深度。
禁止使用聚合函数(如SUM/COUNT)、GROUP BY、ORDER BY、LIMIT、DISTINCT(UNION DISTINCT除外)。
仅能引用 CTE 名称,不能嵌套子查询。
场景:从子节点出发,逐层查找所有上级节点(如员工查询其所有管理层级)。表结构:club(id, name, pid),pid为父节点 ID,根节点pid为NULL。SQL 示例:
1 | WITH RECURSIVE parent_path AS ( |
解析:从 id=5 开始,每次递归通过pid找到父节点,直至无更高层级节点。
场景:从父节点出发,获取其所有直接及间接子节点(如部门主管查询下属团队)。SQL 示例:
1 | WITH RECURSIVE child_path AS ( |
解析:以 id=3 为起点,逐层匹配pid=当前id的子节点,实现无限层级遍历。
场景:在查询结果中显式节点层级,方便分页或排序(如目录树展示)。SQL 示例:
1 | WITH RECURSIVE level_tree AS ( |
解析:通过level字段量化层级深度,避免表设计时预存层级的冗余问题。
场景:传统 Java/Python 代码中,递归遍历组织架构易导致性能瓶颈,改用递归 CTE 后可在数据库层高效完成。MyBatis 映射示例:
1 | WITH RECURSIVE DeptTree AS ( |
优势:避免多次往返数据库,单条 SQL 完成层级查询,提升系统响应速度。
仅支持 MySQL 8.0 及以上版本,低版本需使用存储过程或应用层递归实现。
数据校验:确保层级数据无环(如 A→B→A),否则递归会因无法终止报错(默认最大递归深度 1000,可通过SET @@cte_max_recursion_depth = N调整)。
条件限制:在递归成员中添加合理过滤条件(如WHERE level < 50),防止无限递归。
为id和pid字段添加索引,提升递归过程中 JOIN 操作的效率,尤其对大规模层级数据至关重要。
若数据存在重复关联,可在最终查询中使用DISTINCT去重,但需注意递归成员中禁止直接使用DISTINCT。
递归 CTE 是 MySQL 处理树形数据的 “瑞士军刀”,通过简洁的语法将复杂的层级查询转化为结构化的递归过程,显著提升开发效率与查询性能。无论是组织架构、分类目录还是其他层级场景,掌握递归 CTE 的锚成员定义、递归规则设计及终止条件把控,都能让你在数据处理中游刃有余。建议在实际项目中结合索引优化与数据校验,充分发挥其在层级查询中的优势。
动手实践:尝试在示例表club中插入多级数据,分别编写查询根节点、叶节点及全路径的递归 CTE 语句,观察结果差异与执行效率。
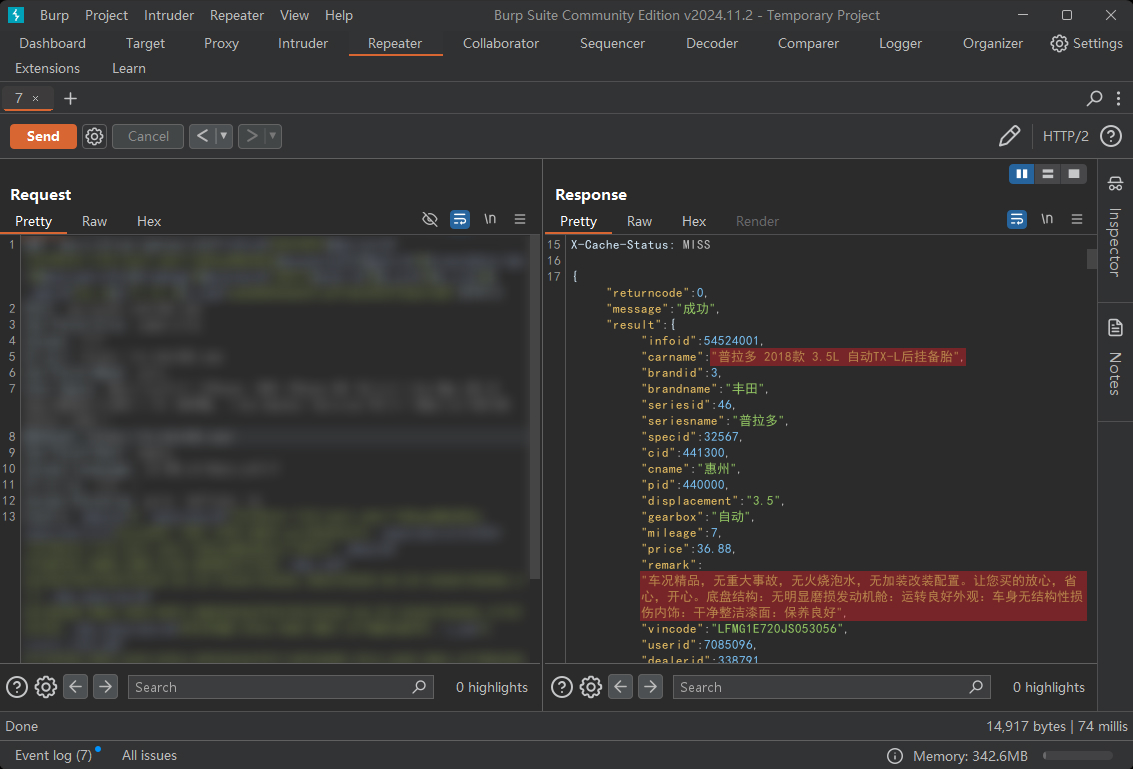
在使用 Burp Suite 进行 HTTP 请求或响应分析时,可能遇到请求参数、响应内容中的中文显示为乱码的情况,例如显示为乱码符号(如方框、问号等),影响数据查看和分析。
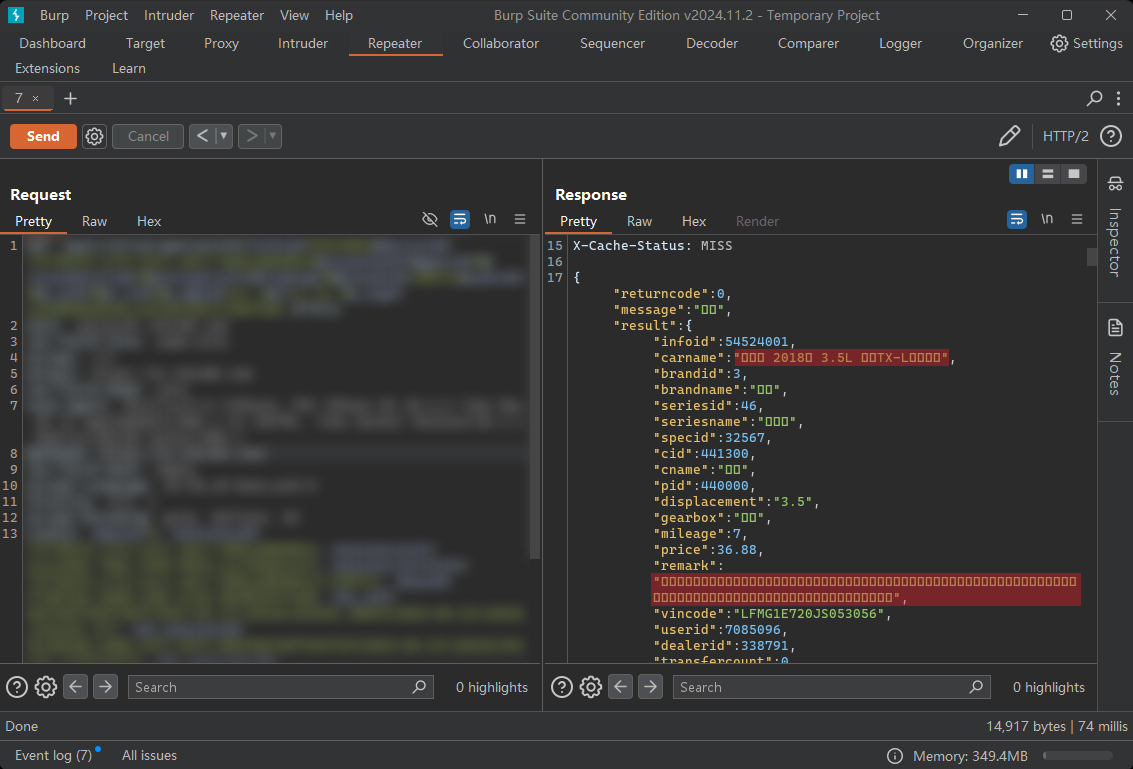
Burp Suite 默认的字符编码或字体设置与中文不兼容,导致无法正确解析和显示中文字符。常见原因包括:
编码格式错误:未设置为 UTF-8(中文通用编码)。
字体不支持中文:默认字体无法渲染中文字符。
解决步骤
进入设置页面
打开 Burp Suite,点击顶部菜单栏的 Settings(设置),选择 User Interface(用户界面)。
修改消息编辑器的编码和字体
在左侧导航栏中选择 Message editor(消息编辑器)。
在右侧的 Character sets(字符编码)下拉菜单中,选择 UTF-8(确保与目标网站的编码一致)。
更换支持中文的字体:
在 Font(字体)选项中,点击 Change font(选择字体),从列表中选择支持中文的字体(如 Microsoft YaHei、SimSun 或 黑体),调整字体大小至合适显示。
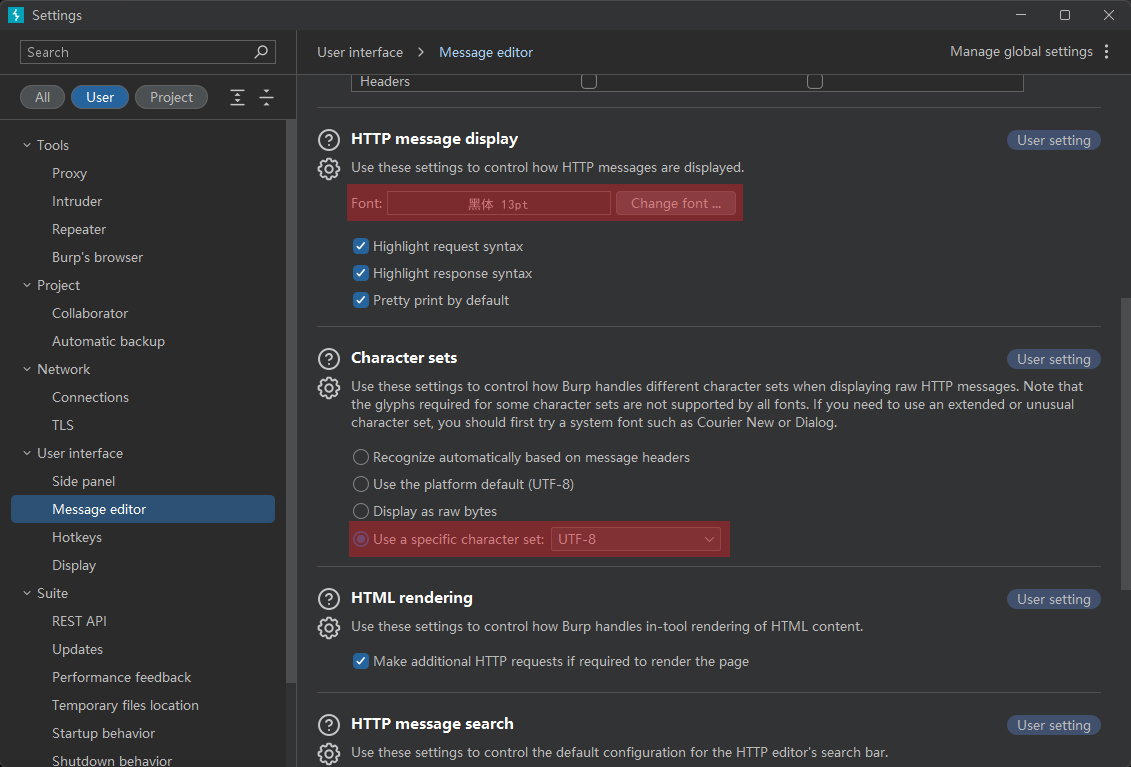
修改完成后,就可以正常查看中文字体了
在 Python 的自动化领域中,PyAutoGUI 是一个非常实用的库,它允许我们通过编写代码来模拟鼠标和键盘的操作,从而实现自动化任务 。无论是重复性的日常工作,还是复杂的软件测试流程,PyAutoGUI 都能发挥重要作用,帮助我们节省时间和精力。
想象一下,你需要在某个软件中重复进行一系列的点击、输入操作,要是手动完成,不仅耗时,还容易出错。但有了 PyAutoGUI,你只需编写一个简单的 Python 脚本,就能让计算机自动执行这些任务。比如自动填写表格、批量处理文件、自动化测试软件功能等,这些操作都能轻松实现。
在开始使用 PyAutoGUI 之前,我们需要先将其安装到我们的 Python 环境中。安装 PyAutoGUI 非常简单,使用 pip 命令即可完成 。打开你的命令行工具,输入以下命令:
1 | pip install pyautogui |
如果你使用的是 Python 3.9 或更高版本,也可以使用pip3命令进行安装:
1 | pip3 install pyautogui |
安装过程中,pip 会自动下载 PyAutoGUI 及其依赖项 。等待安装完成后,你就可以在 Python 脚本中导入并使用 PyAutoGUI 了。
需要注意的是,在安装之前,请确保你的 Python 环境已经正确配置,并且 pip 已经安装在系统上。如果你在 Windows 操作系统上使用 Python,还要确保已将 Python 添加到系统的环境变量中,以便能够在命令提示符中运行 pip。 如果你在安装过程中遇到问题,可以参考 PyAutoGUI 的官方文档,或者在相关技术论坛上寻求帮助。
PyAutoGUI 的强大功能展示
在 PyAutoGUI 中,控制鼠标移动主要通过moveTo()和moveRel()函数 。moveTo()函数用于将鼠标移动到屏幕上的指定坐标位置,它的语法如下:
1 | pyautogui.moveTo(x, y, duration=0) |
其中,x和y是目标坐标的横坐标和纵坐标,duration是可选参数,表示鼠标移动到目标位置所需的时间,单位为秒。如果不设置duration,鼠标会瞬间移动到指定位置。例如,要将鼠标移动到屏幕坐标为 (500, 300) 的位置,可以使用以下代码:
1 | import pyautogui |
moveRel()函数则是相对于当前鼠标位置进行移动,语法为:
1 | pyautogui.moveRel(xOffset, yOffset, duration=0) |
xOffset和yOffset分别是水平和垂直方向上的偏移量,正数表示向右和向下移动,负数表示向左和向上移动。同样,duration是移动所需的时间。比如,要让鼠标在当前位置的基础上向右移动 100 个像素,向下移动 50 个像素,可以这样写:
1 | import pyautogui |
PyAutoGUI 提供了多个函数来实现鼠标的点击操作,包括click()、doubleClick()、rightClick()和middleClick()等 。click()函数是最常用的点击函数,它可以模拟鼠标的左键点击、右键点击以及中键点击,还可以设置点击的次数和间隔时间。语法如下:
1 | pyautogui.click(x=None, y=None, clicks=1, interval=0.0, button='left') |
x和y是点击的坐标位置,如果不指定则在当前鼠标位置点击;clicks表示点击的次数,默认为 1 次;interval是每次点击之间的间隔时间,单位为秒;button指定点击的鼠标按钮,可选值为 ‘left’。例如,要在坐标 (400, 200) 处进行两次左键点击,每次点击间隔 0.5 秒,可以使用以下代码:
1 | import pyautogui |
doubleClick()函数专门用于模拟鼠标左键的双击操作,语法为:
1 | pyautogui.doubleClick(x=None, y=None, interval=0.0) |
x和y是双击的坐标位置,interval是两次点击之间的间隔时间。例如:
1 | import pyautogui |
rightClick()和middleClick()函数分别用于模拟鼠标右键点击和中键点击,语法类似,只需在调用时传入相应的坐标位置即可。例如:
1 | import pyautogui |
实现鼠标拖拽操作的函数是dragTo()和dragRel() 。dragTo()函数将鼠标从当前位置拖动到指定的坐标位置,语法如下:
1 | pyautogui.dragTo(x, y, duration=0, button='left') |
x和y是目标坐标,duration是拖动所需的时间,button指定拖动时使用的鼠标按钮,默认为左键。比如,要将鼠标从当前位置拖动到坐标 (600, 400) 处,耗时 3 秒,可以使用以下代码:
1 | import pyautogui |
dragRel()函数则是相对于当前鼠标位置进行拖动,语法为:
1 | pyautogui.dragRel(xOffset, yOffset, duration=0, button='left') |
xOffset和yOffset是水平和垂直方向上的偏移量,duration是拖动时间,button是鼠标按钮。例如,要让鼠标在当前位置的基础上,向右拖动 80 个像素,向上拖动 30 个像素,耗时 2 秒,可以这样写:
1 | import pyautogui |
控制鼠标滚轮滚动的函数是scroll(),语法如下:
1 | pyautogui.scroll(clicks) |
clicks是一个整数参数,表示滚动的距离,正数表示向上滚动,负数表示向下滚动。例如,要让鼠标滚轮向上滚动 5 个单位,可以使用以下代码:
1 | import pyautogui |
如果要向下滚动 10 个单位,则可以这样写:
1 | import pyautogui |
在 PyAutoGUI 中,模拟按键按下和释放主要使用press()、keyDown()和keyUp()函数 。press()函数用于模拟按下并释放一个按键,语法如下:
1 | pyautogui.press(key) |
key是要按下的按键名称,可以是单个字符,如 ‘a’、’b’,也可以是特殊按键,如 ‘enter’等。例如,要模拟按下回车键,可以使用以下代码:
1 | import pyautogui |
keyDown()函数用于模拟按下一个按键,而不释放,语法为:
1 | pyautogui.keyDown(key) |
keyUp()函数则用于模拟释放一个按键,语法为:
1 | pyautogui.keyUp(key) |
这两个函数通常一起使用,以实现对按键的精确控制。例如,要模拟按住 Shift 键的同时按下 ‘a’ 键,然后释放 Shift 键,可以这样写:
1 | import pyautogui |
实现自动化文本输入的函数是typewrite(),语法如下:
1 | pyautogui.typewrite(message, interval=0.0) |
message是要输入的文本内容,可以是字符串;interval是可选参数,表示输入每个字符之间的时间间隔,单位为秒。例如,要在当前光标位置输入 “Hello, World!”,每个字符之间间隔 0.2 秒,可以使用以下代码:
1 | import pyautogui |
如果要输入包含特殊按键的组合,比如先按 ‘enter’ 键,再输入 “Python”,可以将按键和文本内容放在一个列表中传递给typewrite()函数,例如:
1 | import pyautogui |
模拟组合键操作可以使用hotkey()函数,语法如下:
1 | pyautogui.hotkey(*keys) |
keys是要组合的按键名称,可以传递多个参数。例如,要模拟按下 Ctrl+C 组合键,可以使用以下代码:
1 | import pyautogui |
同样,要模拟按下 Alt+Tab 组合键,可以这样写:
1 | import pyautogui |
获取屏幕截图的函数是screenshot(),它可以返回一个表示屏幕截图的 Pillow 图像对象 。语法如下:
1 | im = pyautogui.screenshot() |
im就是返回的图像对象,你可以对其进行保存、分析等操作。例如,要将屏幕截图保存为名为 “screenshot.png” 的文件,可以使用以下代码:
1 | import pyautogui |
如果你只想截取屏幕的某个区域,可以使用region参数指定截取区域的左上角坐标和宽度、高度,语法如下:
1 | im = pyautogui.screenshot(region=(left, top, width, height)) |
left和top是截取区域左上角的横坐标和纵坐标,width和height是截取区域的宽度和高度。例如,要截取屏幕左上角坐标为 (100, 100),宽度为 200,高度为 150 的区域,可以这样写:
1 | import pyautogui |
在屏幕上查找指定图像位置的函数主要有locateOnScreen()和locateCenterOnScreen() 。locateOnScreen()函数用于在屏幕上查找指定图像的位置,并返回其边界框的坐标,语法如下:
1 | location = pyautogui.locateOnScreen(image, grayscale=False, confidence=None) |
image是要查找的图像文件名或 Pillow 图像对象;grayscale是可选参数,设置为True时会以灰度模式查找图像,这样可以提高查找速度,但可能会降低准确性;confidence是可选参数,表示匹配的置信度,取值范围为 0 到 1,值越高表示匹配要求越严格,默认值为None,即不进行置信度匹配。location返回一个包含边界框坐标的四元组(left, top, width, height),如果未找到图像,则返回None。例如,要在屏幕上查找名为 “button.png” 的图像位置,可以使用以下代码:
1 | import pyautogui |
locateCenterOnScreen()函数则是在屏幕上查找指定图像的位置,并返回其中心点的坐标,语法如下:
1 | center = pyautogui.locateCenterOnScreen(image, grayscale=False, confidence=None) |
center返回一个包含中心点坐标的二元组(x, y),如果未找到图像,则返回None。例如:
1 | import pyautogui |
这些屏幕操作函数结合鼠标和键盘操作函数,可以实现更加复杂的自动化任务,比如根据屏幕上的图像位置进行点击、输入等操作。
实战应用案例
自动化测试
假设我们正在开发一款简单的图形界面应用程序,其中有一个登录窗口,包含用户名输入框、密码输入框和登录按钮 。我们可以使用 PyAutoGUI 编写自动化测试脚本来模拟用户登录操作,检查应用程序的登录功能是否正常。以下是一个简单的示例代码:
1 | import pyautogui |
在这个示例中,我们首先通过locateCenterOnScreen函数查找应用程序图标、用户名输入框、密码输入框和登录按钮的位置,然后使用click和typewrite函数模拟用户的点击和输入操作 。最后,通过查找登录成功后的提示框来判断登录是否成功。这样,我们就可以自动化地对应用程序的登录功能进行多次测试,大大提高了测试效率和准确性。
比如,我们需要从一个电商网站上采集商品信息,包括商品名称、价格、销量等 。我们可以使用 PyAutoGUI 结合一些图像识别和文本处理技术来实现自动化采集。以下是一个简单的思路和示例代码:
1 | import pyautogui |
在这个示例中,我们首先打开浏览器并访问电商网站,然后模拟搜索商品 。接着,通过截取屏幕上商品信息区域的截图,并使用 OCR 技术识别截图中的文本,从而提取出商品的相关信息。最后,通过模拟点击下一页按钮,实现多页商品信息的采集。
假设我们要制作一个关于某个绘图软件使用教程的视频,我们可以使用 PyAutoGUI 自动化演示软件的各种功能,并配合录屏软件进行录制 。以下是一个简单的示例代码,展示如何使用 PyAutoGUI 打开绘图软件并进行一些基本操作:
1 | import pyautogui |
在这个示例中,我们首先通过图像识别找到绘图软件的图标并打开软件 。然后,找到矩形绘制工具并使用鼠标操作绘制一个矩形。最后,演示保存绘制图形的操作。在运行这段代码时,同时开启录屏软件,就可以录制出一个完整的软件使用教程视频,大大提高了制作教程的效率和准确性。
以简单的扫雷游戏为例,我们可以使用 PyAutoGUI 制作一个辅助工具,帮助玩家自动识别雷区和点击安全区域 。以下是一个简单的实现思路和示例代码:
1 | import pyautogui |
在这个示例中,我们首先定义了雷区格子的大小和初始位置,然后加载数字图片模板用于识别雷区中的数字 。recognize_number函数通过模板匹配的方式识别每个格子中的数字,analyze_minefield函数则对整个雷区进行截图并分析每个格子的数字。通过这种方式,我们可以根据识别出的数字来判断哪些区域是安全的,哪些区域可能有雷,从而实现简单的扫雷游戏辅助功能。 请注意,在实际游戏中使用辅助工具可能涉及违反游戏规则的问题,仅用于技术学习和研究目的。
防故障机制
PyAutoGUI 提供了自动防故障功能,默认情况下是开启的 。当鼠标移动到屏幕的左上角时,会触发FailSafeException异常,程序会停止执行,这可以防止程序出现异常情况时无法停止,导致不可预期的后果 。如果你确定自己的程序不会出现问题,或者在调试过程中不想被这个机制中断,可以通过以下方式禁用它:
1 | import pyautogui |
不过,禁用故障保护可能会带来风险,因此请谨慎操作。 另外,为了避免操作速度过快导致程序出错或错过某些界面元素的响应,你可以设置停顿功能 。通过设置pyautogui.PAUSE变量,可以让每个 PyAutoGUI 函数调用在执行动作后暂停指定的秒数。例如,设置暂停时间为 1 秒:
1 | import pyautogui |
这样,在执行诸如鼠标移动、点击、键盘输入等操作后,程序都会暂停 1 秒,给系统和其他应用程序足够的时间来响应。
在使用 PyAutoGUI 进行鼠标操作时,准确获取屏幕坐标非常关键 。你可以使用pyautogui.position()函数来获取当前鼠标的坐标位置,返回一个包含横坐标和纵坐标的元组 。例如:
1 | import pyautogui |
另外,在进行图像识别定位时,为了提高定位的准确性和稳定性,可以设置locateOnScreen()函数的confidence参数 。该参数表示匹配的置信度,取值范围为 0 到 1,值越高表示匹配要求越严格 。例如,将置信度设置为 0.8:
1 | import pyautogui |
当在不同分辨率的屏幕上运行自动化脚本时,由于相同的像素坐标在不同分辨率下代表的实际位置可能不同,会导致坐标不准确 。为了解决这个问题,可以使用pyautogui.size()函数获取当前屏幕的分辨率,并根据分辨率调整坐标 。例如,假设你希望在屏幕中心进行点击操作,无论屏幕分辨率如何变化,都可以这样实现:
1 | import pyautogui |
在使用 PyAutoGUI 时,可能会遇到各种异常情况 。除了前面提到的FailSafeException异常外,还可能遇到ImageNotFoundException异常,当使用locateOnScreen()等图像识别函数找不到指定图像时会抛出该异常 。你可以使用try - except语句来捕获并处理这些异常,使程序更加健壮 。例如:
1 | import pyautogui |
另外,在进行键盘输入操作时,如果目标窗口没有获得焦点,可能会导致输入内容没有出现在预期的位置 。为了避免这种情况,可以在执行键盘输入操作前,使用pyautogui.click()函数先将鼠标点击到目标窗口,使其获得焦点 。例如:
1 | import pyautogui |
通过合理运用这些使用注意事项与技巧,可以让你在使用 PyAutoGUI 进行自动化任务时更加得心应手,提高脚本的稳定性和可靠性 。
frp(Fast Reverse Proxy)是一款开源的高性能内网穿透代理工具,它允许你将位于NAT或防火墙后面的本地服务器暴露到公网上。frp支持TCP、UDP、HTTP和HTTPS协议,使得内部服务可以通过域名被外部访问。此外,frp还提供了P2P连接模式,进一步增强了其灵活性和可用性。
frp以其简洁的设计和丰富的功能而闻名,以下是一些核心特性:
打开浏览器,访问frp的GitHub Releases页面。
在页面中,找到最新发布的版本,这通常会被标记为“Latest”或有相应的版本号。
根据你的操作系统(Windows、Linux或macOS)和架构(如x86_64、arm等),选择相应的预编译二进制文件。
linux_amd64或linux_arm64等命名的压缩文件。darwin。windows_4.0。解压缩下载的文件。对于Linux和macOS用户,可以使用tar命令:
1 | tar -zxvf frp_0.39.0_linux_amd64.tar.gz |
对于Windows用户,可以使用文件资源管理器或第三方解压缩软件解压.zip文件。
在解压缩的目录中,你会找到frps和frpc两个可执行文件,分别对应服务器端和客户端。
将frps和frpc移动到合适的目录,例如/usr/local/bin(需要管理员权限):
1 | sudo mv frps frpc /usr/local/bin/ |
在命令行中运行frps -v和frpc -v来检查二进制文件是否正确无误:
1 | frps -v |
这将显示frp的版本信息,确认安装成功。
frp的使用涉及两个主要组件:frps(服务器端)和frpc(客户端)。以下是一些基本的示例用法,帮助你快速开始使用frp。
frps.toml:1 | # frps.toml |
frps:1 | ./frps -c ./frps.toml |
frpc.toml:1 | # frpc.toml |
frpc:1 | ./frpc -c ./frpc.toml |
1 | ssh -p 6000 用户名@服务端公网IP |
frps.toml:1 | # frps.toml |
frps:1 | ./frps -c ./frps.toml |
frpc.toml:1 | # frpc.toml |
frpc:1 | ./frpc -c ./frpc.toml |
配置域名解析:
将www.example.com的A记录指向frps服务器的公网IP。
访问Web服务:
通过浏览器访问http://www.example.com:8080。
这些示例仅展示了frp的一小部分功能。frp的灵活性和强大的功能使其成为内网穿透的有力工具。你可以根据具体需求调整配置,实现更复杂的网络穿透和代理需求。